How to Use Mushroom Grow Bags: Easy Steps for Successful Harvests
If you’ve ever thought about growing your own mushrooms but felt it was too complicated, mushroom grow bags might be the perfect solution for you. These specially designed bags make the process cleaner, easier, and more efficient—no messy setups or bulky equipment needed.
Imagine having fresh, homegrown mushrooms ready to harvest right from your kitchen or garden. You’ll discover step-by-step how to use mushroom grow bags effectively, avoid common mistakes, and get the best results possible. Keep reading and take the first step toward a rewarding and surprisingly simple way to grow mushrooms at home.
Choosing The Right Grow Bag
Choosing the right mushroom grow bag is key to a successful harvest. The right bag ensures good air exchange and protects the growing mushrooms. It also helps maintain moisture and prevents contamination. Picking the right type depends on your mushroom species and growing setup. Knowing where to buy quality grow bags saves time and effort.
Types Of Mushroom Grow Bags
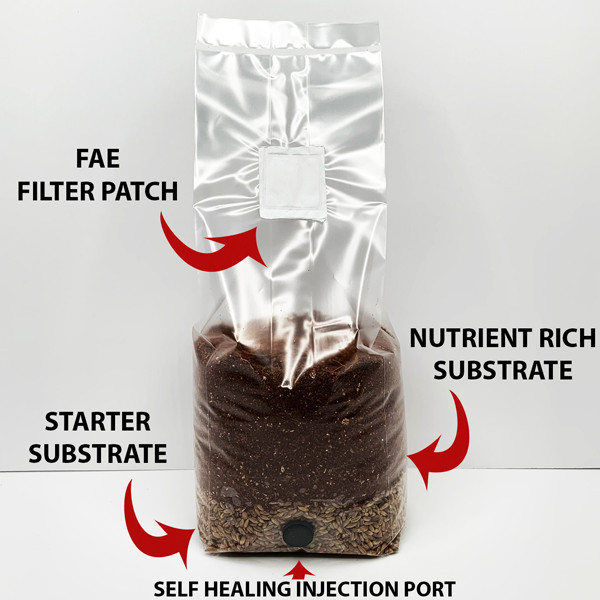
Mushroom grow bags come in several types. Some have built-in filters for air exchange. Others are simple plastic bags that need holes punched. Filter patch bags allow oxygen in while keeping contaminants out. Thick bags hold moisture better and last longer. Thin bags are cheaper but may tear easily. Choose a bag that fits your growing needs and budget.
Selecting Based On Mushroom Species
Different mushrooms need different bags. Oyster mushrooms grow well in bags with good air flow. Shiitake mushrooms need bags with strong moisture retention. Button mushrooms prefer bags that keep humidity steady. Some species require bags with special filters to avoid contamination. Check the specific needs of your mushroom type. This helps select a bag that supports healthy growth.
Where To Buy Quality Bags
Buy mushroom grow bags from trusted suppliers. Look for companies that specialize in mushroom growing supplies. Online stores often offer a wide range of options. Local gardening shops may carry basic grow bags. Read product descriptions carefully to ensure quality. Avoid very cheap bags that may tear or lack filters. Good quality bags improve your chances of a good crop.

Credit: www.amazon.com
Preparing The Substrate
Preparing the substrate is a key step in growing mushrooms using grow bags. The substrate provides nutrients and a home for the mushroom mycelium to grow. Proper preparation helps prevent contamination and promotes healthy mushroom growth. Follow these steps to prepare a good substrate for your mushroom grow bags.
Ingredients For Mushroom Substrate
Common ingredients include hardwood sawdust, straw, and coco coir. Some growers add wheat bran or coffee grounds for extra nutrients. Use clean, dry materials to avoid mold or bacteria. Mix the ingredients evenly for consistent nutrition.
Sterilizing And Pasteurizing Methods
Sterilizing kills all unwanted organisms in the substrate. Use a pressure cooker at 15 psi for 1-2 hours. Pasteurizing removes harmful microbes but keeps beneficial ones. Heat the substrate to 160-180°F (71-82°C) for 1-2 hours. Let it cool before filling the grow bag.
Filling The Grow Bag Properly
Fill the grow bag with the cooled substrate. Do not overfill; leave space for air exchange. Compress the substrate lightly to remove air pockets. Seal the bag tightly to keep contaminants out. Label the bag with the date and mushroom strain.
Inoculating The Grow Bag
Inoculating the grow bag is a crucial step in mushroom cultivation. This process introduces mushroom spawn into the prepared substrate inside the bag. Proper inoculation ensures healthy mycelium growth and a successful harvest. Following the right techniques reduces risks and improves results.
Choosing The Right Spawn
Select spawn that matches your mushroom species. Grain spawn is common and easy to use. Sawdust spawn also works well for many types. Fresh, high-quality spawn has the best chance to colonize quickly. Avoid old or dried-out spawn to prevent slow growth or failure.
Step-by-step Inoculation Process
Start by sterilizing your hands and workspace. Use gloves and wipe surfaces with alcohol. Make a small hole or open the injection port on the grow bag. Insert the spawn carefully without exposing it to air for too long. Seal the hole immediately to keep the environment sterile. Gently shake the bag to spread the spawn evenly throughout the substrate. Label the bag with the date and mushroom type. Store the bag in a dark, warm place for mycelium to grow.
Preventing Contamination
Cleanliness is key to avoid contamination. Always work in a clean area and use sterile tools. Avoid touching the inside of the bag or substrate directly. Keep pets and dust away during inoculation. Use only sealed bags or bags with filters to allow air exchange without letting contaminants in. Monitor the bag regularly for any unusual colors or smells. Discard any contaminated bags immediately to protect your other grow bags.
Incubation Phase
The incubation phase is the critical first step after inoculating mushroom grow bags. During this time, the mushroom mycelium spreads inside the substrate. Proper care helps the mycelium develop strong and healthy. This phase usually lasts from 10 to 21 days, depending on the mushroom species and conditions.
Ideal Temperature And Humidity
Maintain a stable temperature between 70°F and 80°F (21°C to 27°C). Temperatures outside this range slow mycelium growth or cause contamination. Keep humidity around 70% to 90% to prevent the substrate from drying out. Avoid excess moisture that can lead to mold or bacteria.
Light Requirements
Mycelium grows best in low or indirect light during incubation. Avoid direct sunlight as it may dry out the bag. A dim room or shaded area is ideal. Light is not needed for mycelium to colonize the substrate but helps prepare it for fruiting later.
Monitoring Mycelium Growth
Check the bags daily for signs of growth and contamination. Healthy mycelium looks white and fuzzy. Watch for green, black, or pink patches, which indicate contamination. If contamination appears, remove the affected bag immediately. Patience is key; full colonization may take up to three weeks.
Triggering Fruiting
Triggering fruiting is the crucial step in mushroom cultivation using grow bags. This phase moves the mycelium from colonization to producing mushrooms. The right actions and environment changes prompt the fungi to start fruiting. Careful handling ensures a healthy and abundant mushroom harvest.
When And How To Cut The Bag
Cut the grow bag once the substrate is fully colonized and looks white all over. Use a clean, sharp knife or scissors for a neat cut. Make small slits or open the top of the bag gently. This allows mushrooms to grow out without damaging the mycelium inside. Avoid cutting too early to prevent weak or no fruiting.
Adjusting Environment For Fruiting
Lower the temperature to around 60-70°F (15-21°C) to encourage fruiting. Provide indirect light for 12 hours a day to simulate natural conditions. Keep the grow bag in a place with fresh air movement but no strong drafts. These changes signal the mushrooms that it is time to grow and develop.
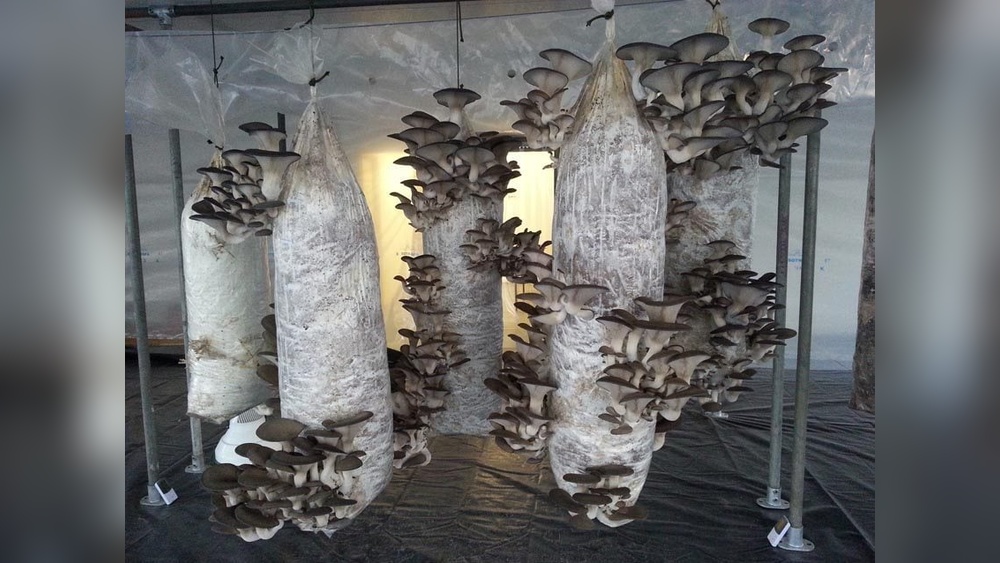
Maintaining Humidity And Fresh Air
Keep humidity levels high, around 85-95%, for the best mushroom growth. Mist the inside of the bag or use a humidity tent to maintain moisture. Open the bag or area periodically to allow fresh air exchange. Proper humidity and fresh air prevent mold and help mushrooms grow firm and healthy.
Credit: www.funguygrowsupply.com
Harvesting Mushrooms
Harvesting mushrooms from grow bags is an exciting part of the growing process. It shows the effort and patience have paid off. Proper harvesting protects the mushrooms and helps the grow bag produce more yields. Knowing the right time and method to harvest ensures fresh, high-quality mushrooms.
Signs Mushrooms Are Ready
Look for mushrooms with caps fully opened but not too old. The edges of the caps should be flat or slightly curled up. Avoid harvesting when caps are still tightly closed or when they start to drop spores. The size depends on the mushroom type but usually ranges from one to four inches wide. Fresh mushrooms feel firm and have a pleasant smell.
Proper Harvesting Techniques
Use clean hands or a sharp knife to harvest mushrooms. Cut the stem near the base to avoid damaging the mycelium. Do not pull or twist the mushrooms from the bag. Gentle handling prevents bruising and contamination. Harvest in the morning for the best texture and flavor. Always clean tools before and after harvesting.
Handling Multiple Flushes
Grow bags often produce several mushroom flushes. After the first harvest, keep the bag moist and in a suitable environment. Mist the bag lightly to maintain humidity. Avoid overwatering as it can cause mold. Wait for new pins to form before harvesting again. Multiple flushes can extend your mushroom harvest for weeks.
Storing And Reusing Grow Bags
Storing and reusing mushroom grow bags helps save money and reduce waste. Proper care keeps bags clean and ready for the next use. Understanding how to store bags before and after use is important. Knowing ways to extend their lifespan makes growing easier. When bags are no longer usable, proper disposal or composting is key.
Storage Before And After Use
Store grow bags in a cool, dry place before use. Avoid direct sunlight to prevent damage. Keep bags away from dust and pests. After harvesting, clean the bags if possible. Dry them completely to stop mold growth. Store used bags in a sealed container or bag to keep them safe.
Extending Grow Bag Lifespan
Handle grow bags gently to avoid punctures or tears. Use sharp scissors to open bags carefully. Avoid overfilling bags with substrate or water. Keep the bags in a controlled environment during growth. Clean tools and hands before handling bags. These steps help bags last longer for future crops.
Disposal Or Composting Tips
When grow bags cannot be reused, recycle or compost them properly. Check if the bag material is biodegradable. If so, cut the bag into smaller pieces before composting. Add pieces to your compost bin with other organic waste. For plastic bags, dispose of them according to local recycling rules. Avoid burning plastic bags to protect the environment.
Troubleshooting Common Issues
Troubleshooting common issues in mushroom grow bags helps improve your success rate. Small problems can stop mushrooms from growing well. Understanding these issues saves time and effort. Here are some common problems and easy fixes.
Dealing With Contamination
Contamination often shows as green, black, or pink spots on the substrate. It occurs from unclean tools or air. Remove contaminated bags quickly to stop spread.
Keep your workspace clean and sterilize everything before use. Use gloves and masks to reduce germs. Avoid opening bags too early or too often.
Poor Mycelium Growth
Slow or patchy mycelium growth means something is wrong. Check if the substrate is too dry or too wet. Mycelium needs moisture but not soaking wet conditions.
Ensure the bag is sealed but allows some air exchange. Use fresh spores or spawn to avoid weak growth. Keep temperature steady for best results.
Environmental Challenges
Temperature, light, and humidity affect mushroom growth greatly. Too hot or cold slows growth or stops it. Keep bags in a place with stable temperatures around 70°F (21°C).
Avoid direct sunlight on the bags. Indirect light or darkness works better. Maintain humidity above 80% for healthy mushrooms. Use a humidifier if needed.
Conclusion
Using mushroom grow bags makes growing mushrooms simple and clean. Keep bags in a cool, dry place with indirect light. Watch moisture levels to avoid mold or dryness. Cut the bag carefully to let mushrooms grow freely. Regularly check for any signs of contamination.
With patience and care, you can enjoy fresh mushrooms at home. This method suits beginners and experts alike. Try growing mushrooms in bags and see how easy it can be.