How to Use a Seed Starter Tray: Ultimate Guide for Thriving Seedlings
Starting plants from seeds is fun and easy. A seed starter tray helps your seeds grow strong. This guide will show you how to use a seed starter tray step by step. You will learn simple ways to plant seeds and care for them.
What is a Seed Starter Tray?
A seed starter tray is a small container with many tiny sections. Each section holds soil and seeds. These trays help seeds grow into young plants called seedlings. Seedlings grow indoors before moving outside.
Why Use a Seed Starter Tray?
- Easy to manage: You can see seeds grow in one place.
- Better care: You control water, light, and temperature.
- Stronger plants: Seedlings grow healthy and ready to plant.
- Save space: Trays fit on tables or windowsills.
Materials You Need
Before you start, gather these items:
- Seed starter tray with cells
- Seed starting soil or mix
- Seeds you want to grow
- Water spray bottle or gentle watering can
- Clear plastic cover or lid (if your tray has one)
- Warm place with light
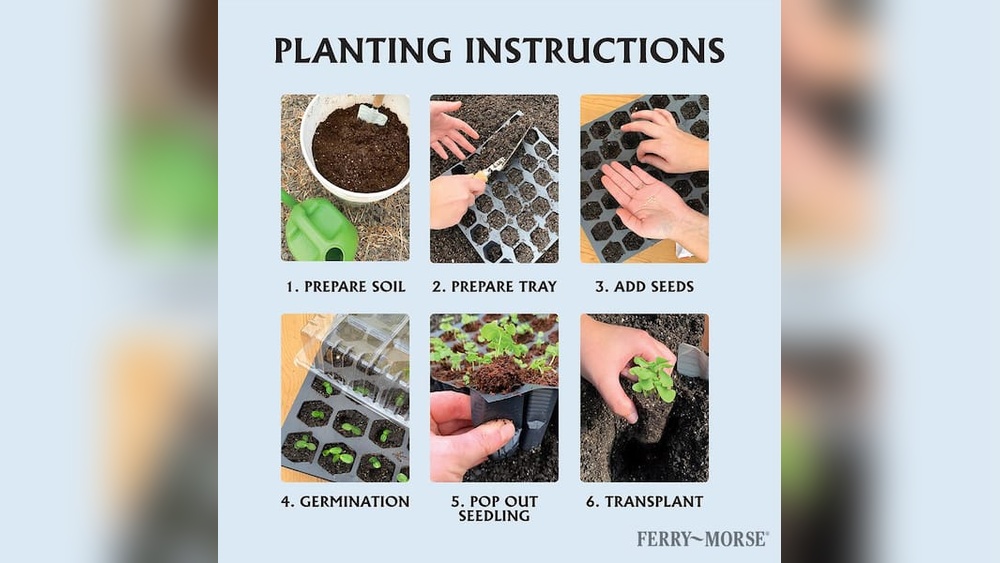
Step 1: Prepare the Seed Starter Tray
First, clean your tray. Make sure no dirt or old plant parts remain. This helps stop diseases. Then fill each cell with seed starting soil. Fill almost to the top but leave some space. Do not pack the soil tight. Loose soil helps roots grow better.
Step 2: Plant the Seeds
Read your seed packet. It tells you how deep to plant the seeds. Most seeds need to be planted about twice as deep as their size. For example, if the seed is 1 millimeter, plant it 2 millimeters deep.
Plant one or two seeds in each cell. If you plant more, seedlings may crowd and grow weak. Cover the seeds gently with soil. Pat the soil lightly but do not press hard.
Step 3: Water the Seeds
Use a spray bottle or watering can to water the soil. Make the soil moist but not soaked. Too much water can harm seeds. Watering from the bottom is also good. Place a little water under the tray. The soil will soak water up by itself.
Step 4: Cover and Place the Tray
Many seed trays come with a clear plastic lid. Put it on to keep warmth and moisture. If your tray has no lid, cover it with plastic wrap or a clear plastic bag. This keeps the seeds moist and warm, helping them sprout faster.
Place the tray in a warm place. Most seeds like 65 to 75 degrees Fahrenheit (18 to 24 Celsius). Keep the tray out of direct sunlight. Too much sun may dry out soil or burn seedlings.
Step 5: Watch for Germination
Germination means the seed starts to grow. This can take a few days to weeks. Check the soil every day. Keep it moist but not wet. Remove the cover once most seeds sprout. This lets fresh air in and stops mold.

Credit: ferrymorse.com
Step 6: Give Seedlings Light
Seedlings need light to grow strong. Place the tray near a sunny window. If natural light is not enough, use a grow light. Keep light on for 12 to 16 hours daily. Move the light close to seedlings but not touching.
Step 7: Thin the Seedlings
Thinning means removing extra seedlings. If more than one seed grows in a cell, pick the strongest one. Use scissors to cut the small seedlings at the soil line. Do not pull them out. This stops root damage.
Step 8: Water and Care for Seedlings
Water seedlings when soil feels dry. Use a spray bottle or water gently. Avoid wetting leaves too much. Good air circulation helps seedlings stay healthy. If leaves look yellow or wet, check watering and light.
Step 9: Prepare to Transplant
When seedlings grow 2 to 4 sets of leaves, they are ready to move. This is called transplanting. Harden off seedlings first. Harden off means slowly getting plants used to outside. Put them outside for a few hours each day. Increase time over a week.
Step 10: Transplant Seedlings Outdoors
Choose a good spot in your garden. Dig holes big enough for the seedling roots. Gently take seedlings from the tray. Place them in holes and cover with soil. Water well to help roots settle.
Tips for Success
- Label your trays with seed names and dates.
- Use clean tools and trays to avoid disease.
- Keep soil moist but not soggy.
- Give seedlings enough light for strong growth.
- Thin seedlings to avoid crowding.
- Harden off seedlings before planting outside.
Common Problems and Solutions
| Problem | Cause | Solution |
|---|---|---|
| No seeds sprouting | Old seeds or wrong temperature | Use fresh seeds and keep warm |
| Mold on soil | Too much water or poor air | Water less and give air flow |
| Weak, leggy seedlings | Not enough light | Move tray to brighter spot |
| Seedlings dying | Overwatering or disease | Check watering and clean trays |
Types of Seed Starter Trays
You can choose from different trays. Some trays are plastic and reusable. Others are biodegradable and go into the soil after transplant. Choose a tray that fits your needs and budget.
- Plastic trays: Durable, easy to clean, reusable.
- Biodegradable trays: Eco-friendly, break down in soil.
- Cell trays: Have many small sections for each seed.
- Flat trays: Good for large seeds or many seeds at once.
Credit: www.reddit.com
Frequently Asked Questions
How Many Seeds Do You Put In A Seedling Tray?
Place two to three seeds per cell in a modular seedling tray. For non-modular trays, follow seed packet spacing guidelines. Avoid overcrowding to ensure healthy growth and prevent mold. Adjust seed quantity based on plant size and growth reliability.
How To Use Seed Sprouting Trays?
Spread seeds evenly in the sprouting tray and soak with cool water. Rinse seeds well after soaking. Drain excess water by tilting the tray. Keep the tray in a cool, shaded place with good air circulation. Cover it to protect from light and contaminants during germination.
Should I Put Water In The Bottom Of My Seedling Tray?
Do not put water in the bottom of your seedling tray unless it has drainage holes. Keep soil moist but not waterlogged. Use bottom watering only with trays designed for it to prevent root rot and promote healthy seedling growth.
How Long Do You Leave Seedlings In A Seed Tray?
Leave seedlings in a seed tray for 4 to 6 weeks until they develop 2-3 true leaves. Then, transplant carefully.
Conclusion
Using a seed starter tray is simple and fun. It helps your seeds grow into healthy seedlings. Follow these easy steps to plant, water, and care for seeds. Watch them grow and get ready to plant outside. With a little patience, you will enjoy fresh plants and flowers.
Start your seed growing journey today. See how easy it is to use a seed starter tray.