How to Make a Self Watering Bottle for Plants: Easy DIY Guide
Are you tired of constantly remembering to water your plants? What if you could create a simple, effective system that waters your plants for you, even when you’re busy or away?
Making a self-watering bottle for your plants is easier than you think. With just a few common materials, you can build a DIY watering solution that keeps your plants healthy and thriving without daily effort. In this guide, you’ll discover step-by-step how to make your own self-watering bottle, save time, and ensure your plants get the perfect amount of water every day.
Keep reading to unlock this easy hack that every plant lover needs!

Credit: londontolandgirl.com
Materials Needed
Creating a self watering bottle for your plants needs a few simple materials. These materials help keep your plants hydrated without daily watering. Gathering the right supplies is the first step to a successful DIY project.
Choosing The Right Bottle
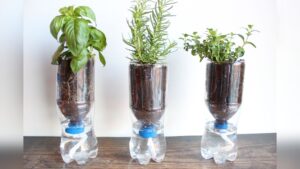
Select a clean plastic or glass bottle with a narrow neck. A 1-liter soda bottle works well. The bottle should be easy to handle and fit near your plant. Transparent bottles help you see the water level. Avoid bottles with labels that can’t be removed.
Additional Supplies
You will need a sharp tool like a knife or scissors to make holes. Cotton string or a wick helps water move slowly to the soil. Some tape or glue may be useful to secure parts. Optional items include a small funnel and a drill for neat holes.

Credit: m.youtube.com
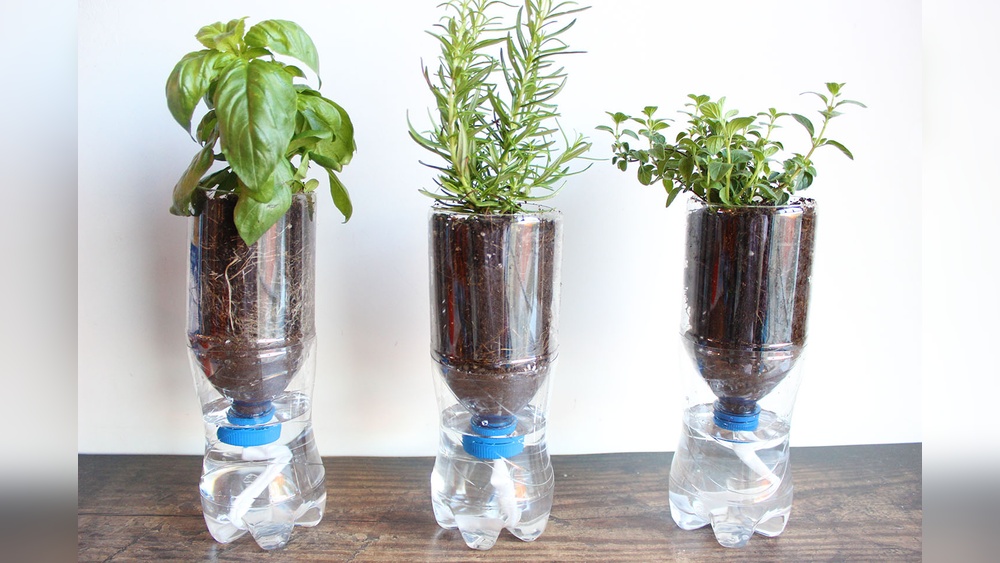
Preparing The Bottle
Preparing the bottle is the first step to create a self-watering system. Choose a clean plastic bottle, usually a soda or water bottle works well. The bottle must be easy to handle and sturdy enough to hold water without leaking.
Proper preparation ensures water flows steadily to your plants. It also helps avoid spills and keeps the system working longer.
Cutting The Bottle
Start by cutting the bottle into two parts. Use a sharp knife or scissors for a clean cut. Cut about one-third from the top of the bottle. This part will be inverted to hold the soil and plant.
Make sure the cut edge is smooth. If needed, sand it lightly to avoid sharp edges. This helps prevent injury and makes the bottle fit better when inverted.
Creating Water Flow Holes
Next, create holes to allow water to flow slowly. Use a hot needle or small nail to make several tiny holes in the bottle cap. These holes control water release to the plant’s roots.
Also, poke some small holes at the bottle neck’s tip. This helps air enter and keeps water flowing smoothly. Avoid making holes too large; water should drip slowly to keep the soil moist.
Building The Self-watering System
Building a self-watering system for your plants saves time and keeps them healthy. It controls water flow and ensures plants get moisture regularly. Two popular methods include wick systems and drip irrigation. Both are simple and use common materials.
Making A Wick System
A wick system uses a piece of fabric or string to draw water from the bottle to the soil. Choose a cotton or nylon string about 6 to 8 inches long. Insert one end into the water bottle and place the other end deep into the soil near the plant roots.
The wick pulls water slowly, keeping soil moist without flooding. Make sure the bottle is filled with clean water and placed above the soil level. This setup works well for small pots and indoor plants.
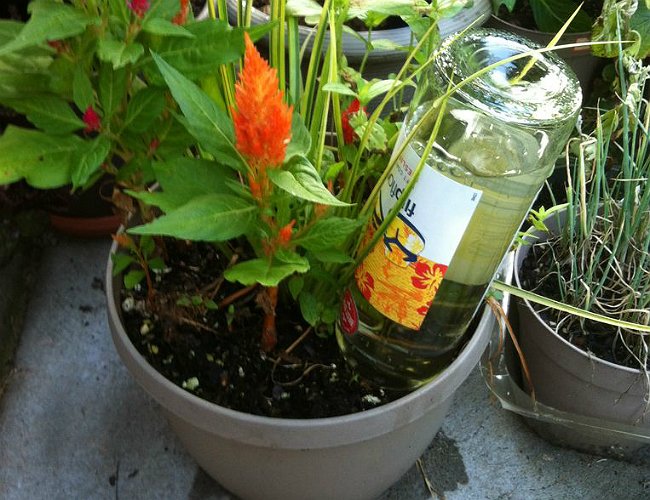
Setting Up A Drip Irrigation
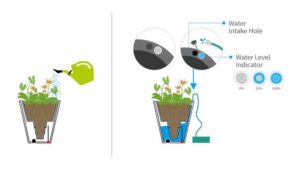
Drip irrigation delivers water drop by drop directly to the soil. Use a plastic bottle with a small hole poked in its cap. Fill the bottle with water and invert it into the soil near the plant base.
The hole controls water flow, releasing drops slowly. Adjust the hole size to control how fast water drips out. This method suits larger pots and outdoor plants, giving steady moisture without overwatering.
Installing The Bottle
Installing the self-watering bottle correctly helps your plants absorb water slowly. This step ensures the bottle releases water directly to the roots. Proper installation keeps the soil moist without overwatering. Follow the tips below for best results.
Positioning In The Soil
Place the bottle neck downward near the plant roots. The water will drip slowly into the soil here. Bury the bottle so the opening is under the surface. Avoid placing it too close to the plant stem. This prevents root damage and keeps water flow steady. Check that the bottle stands upright and is stable.
Securing The Bottle
Press soil firmly around the bottle to hold it in place. Use small stones or sticks for extra support if needed. The bottle must not wobble or tilt. A steady bottle ensures consistent water delivery. Make sure the bottle top is sealed or covered to reduce evaporation. Secure installation helps your self-watering system work for a long time.
Maintaining Your System
Maintaining your self watering bottle system keeps your plants healthy and hydrated. Regular care ensures steady water flow. It also prevents blockages and mold build-up. Follow simple steps to keep your system working well.
Refilling Water
Check the water level often. Refill the bottle before it runs dry. Use clean, fresh water for the best results. Avoid using hard or salty water. This helps plants absorb water easily. Refill gently to avoid disturbing the soil.
Cleaning Tips
Clean the bottle and watering tube regularly. Remove dirt and algae that can block water flow. Use warm soapy water and a soft brush. Rinse thoroughly to remove soap residue. Let parts dry completely before reassembling. This keeps water fresh and plants healthy.
Troubleshooting Common Issues
Troubleshooting common issues in a self-watering bottle system helps keep plants healthy. Problems may arise from water flow or unwanted mold growth. Fixing these quickly ensures your plants get the right moisture. Here are solutions to frequent challenges.
Water Flow Problems
Water may not flow properly if the bottle opening is blocked. Dirt or soil can clog the neck of the bottle. Clean the bottle neck and make sure it is clear.
Sometimes, air gets trapped inside, stopping water flow. To fix this, poke small holes in the bottle cap or remove it. This lets air enter and water drip out smoothly.
Check the bottle’s position. It must be tilted slightly downward toward the soil. This helps water move steadily to the roots. Adjust the bottle if water is not reaching the plant.
Preventing Mold And Algae
Standing water can cause mold and algae growth in the bottle. Clean the bottle regularly with mild soap and rinse well. This stops mold spores from building up.
Use filtered or distilled water to reduce algae growth. Tap water may contain minerals that feed algae. Keeping water clean helps plants stay healthy.
Place the bottle where it gets less direct sunlight. Sunlight encourages algae growth. A shaded spot slows down this problem.
Benefits Of Self-watering Bottles
Self-watering bottles offer an easy way to care for your plants. They provide water slowly and steadily to the soil. This method helps plants get the right amount of water. It also saves time and effort for gardeners. Below are two main benefits of using self-watering bottles.
Water Conservation
Self-watering bottles reduce water waste significantly. Water drips slowly into the soil, so less water evaporates. This method targets the plant roots directly. It stops water from spilling or running off. Using less water is good for the environment. It also lowers your water bills.
Plant Health Improvement
Plants get a steady supply of moisture with self-watering bottles. This prevents overwatering and underwatering. Roots stay moist but not soggy, which reduces root rot risk. Consistent watering helps plants grow stronger. Healthy roots absorb nutrients better. Overall, plants look healthier and live longer.
Credit: www.bobvila.com
Creative Variations
Creating a self watering bottle for your plants can be a simple task. Adding creative variations makes it even more fun and personal. This section explores ways to customize your watering bottle. These ideas help fit your style and plant needs.
Using Different Bottle Types
Various bottles work well for self watering systems. Plastic soda bottles are common and easy to find. Glass bottles, like old wine or juice bottles, add a unique look. Smaller bottles suit indoor plants with less water need. Larger bottles hold more water, ideal for big plants or outdoor gardens. Consider the bottle’s neck size for how water drips out. Experiment with shapes and sizes to see what fits your plants best.
Adding Decorative Elements
Decorate your self watering bottle to brighten your space. Paint the bottle with waterproof colors or patterns. Use stickers or washi tape for quick decoration. Wrap twine or ribbon around the bottle neck for a rustic look. Add small charms or beads for extra charm. These touches make your watering bottle blend with your room or garden style. Decoration also makes plant care more enjoyable and personal.
Frequently Asked Questions
How To Make Your Own Self-watering Bottle For Plants?
Cut a plastic bottle in half. Invert the top inside the bottom. Fill with water. Insert the neck into soil near roots.
How Can I Automatically Water My Plants While On Vacation?
Use a water-filled plastic bottle with small holes, invert it, and insert into soil for slow watering. Automated drip systems also work well.
How Do You Make Homemade Self Watering Hacks?
Cut a plastic bottle, invert the top into the base, fill with water, and place soil around the neck for slow watering.
Can I Build My Own Automatic Watering System?
Yes, you can build your own automatic watering system using simple materials like plastic bottles. It saves water and keeps plants healthy.
Conclusion
Making a self-watering bottle is simple and saves time. It helps plants get water slowly and steadily. You only need a few basic materials to start. This method keeps soil moist without daily watering. It works great for busy people or when away.
Try this easy DIY to keep your plants healthy. Watch them grow with less effort and care. Give your plants the steady water they need today.