How to Make a Self Waterer for Plants: Easy DIY Guide
Are you tired of constantly worrying about watering your plants just right? Imagine a simple way to keep your plants hydrated without daily effort, even when you’re busy or away.
Making a self-watering system for your plants can save you time and help your greenery thrive. In this guide, you’ll learn how to create an easy, budget-friendly self-watering setup using everyday items like plastic bottles and cotton strings. Follow these straightforward steps, and you’ll never have to stress about overwatering or underwatering again.
Ready to give your plants the care they deserve with minimal work? Let’s dive in!
Credit: www.ehow.com
Materials Needed
Creating a self-watering system for your plants requires simple and easy-to-find materials. These items help deliver water directly to your plant’s roots. The right materials ensure steady moisture and healthy growth. Below are the main materials you will need to get started.
Plastic Bottle Options
Choose a plastic bottle that holds enough water for your plant. A 1-liter or 2-liter bottle works well. Clear bottles help you see the water level. Dark bottles reduce algae growth. Make sure the bottle has a cap to control water flow.
Wicking Materials
Wicking materials draw water from the bottle to the soil. Cotton string or shoelace works best. These materials soak up water and release it slowly. Avoid synthetic fibers, as they do not absorb water well. The wick should be long enough to reach from the bottle to the plant roots.
Additional Tools
Gather basic tools to assemble your self-watering system. A sharp knife or scissors will cut the bottle and wick. A pin or needle can poke small holes in the bottle cap for drip systems. A marker helps mark cutting points on the bottle. Gloves protect your hands while working.
Preparing The Bottle
Preparing the bottle is a key step in making a self waterer for plants. This process ensures the bottle can hold water and release it slowly to the plant’s roots. You need to clean, cut, and add holes for the drip system. Each step must be done carefully for the system to work well.
Cleaning And Cutting
Start with a clean plastic bottle. Rinse it thoroughly to remove any dirt or labels. This keeps the water pure and prevents mold growth.
Next, cut the bottle carefully. Usually, cutting the bottle in half works best. The top part will be inverted to hold the water, and the bottom will catch drips or hold soil.
Use a sharp knife or scissors. Cut slowly to avoid jagged edges. Smooth the edges with sandpaper if needed to prevent injury.
Making Holes For Drip System
Make small holes in the bottle to allow water to drip slowly. The cap is the best place for one or two tiny holes. Use a needle or pin to poke these holes.
Test the holes by filling the bottle with water and inverting it. Water should drip slowly without flooding the soil.
If you want, make a few small holes near the bottle’s sides. These help release air and keep water flowing smoothly.
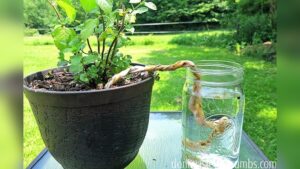
Setting Up The Wick
Setting up the wick is a key step in making a self waterer for plants. The wick draws water from the reservoir to the soil. It helps keep the soil moist without overwatering. Choosing the right wick and placing it properly in the soil makes the system work well. Follow these tips to set up your wick correctly.
Choosing The Right String
Select a string made from natural fibers like cotton or jute. These materials absorb water easily and release it slowly to the soil. Avoid synthetic strings as they do not absorb water well. A shoelace or cotton twine works great for this purpose. The string should be thick enough to hold water but thin enough to fit in the soil.
Positioning In Soil
Insert one end of the wick deep into the soil near the plant’s roots. This placement ensures the water reaches the roots directly. Make sure the wick is buried at least 2 to 3 inches into the soil. Keep the other end of the wick inside the water bottle or reservoir. This setup allows water to move steadily from the bottle to the soil.

Credit: scissorsandsage.com
Assembling The Self-watering System
Assembling the self-watering system is simple and fun. This step brings together all parts to create a steady water source for your plants. Follow each part carefully to ensure your plants get just the right amount of water. A well-assembled system saves time and helps plants grow healthy.
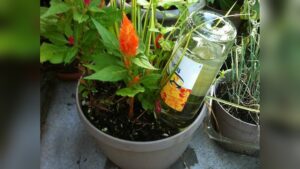
Filling The Water Reservoir
Start by choosing a clean plastic bottle. Remove its cap and fill the bottle with fresh water. Fill it almost to the top but leave some space to avoid spills. Use water at room temperature to protect plant roots. Once filled, screw the cap back on tightly to prevent leaks.
Connecting Wick To Bottle
Take a cotton string or shoelace as your wick. Thread one end of the wick through a small hole in the bottle cap. Make sure the wick fits snugly in the hole for slow water flow. The wick’s other end goes into the plant’s soil. Place it deep near the roots for best water absorption.
Adjusting Flow Rate
Control water flow by adjusting the wick length inside the soil. A longer wick delivers more water, a shorter wick less. Test the flow by watching soil moisture for a day or two. If soil stays wet too long, shorten the wick. If soil dries fast, lengthen the wick for steady watering.
Installing The System In The Plant Pot
Installing the self-watering system inside the plant pot is a key step. It ensures your plant receives water steadily without daily attention. Proper installation helps maintain soil moisture and promotes healthy growth.
Follow simple steps to place the system correctly. This makes watering easier and prevents overwatering or water waste.
Placement Tips
Place the water reservoir near the plant’s root zone. This allows water to reach roots efficiently. Avoid placing it too deep or too far from the plant.
Make sure the wick or drip outlet touches the soil directly. This helps water flow smoothly to the roots. Keep the water source stable to avoid spills.
Ensuring Stability
Secure the water container firmly in the pot. Use soil or small stones around the base to keep it steady. Avoid tilting or moving the container after placement.
A stable system prevents water leaks and keeps the plant safe. Check stability regularly, especially on windy surfaces or outdoor setups.
Maintenance And Refilling
Keeping your self-watering system in good shape ensures healthy plants. Regular maintenance helps avoid dry soil or overwatering. Refilling the water supply on time keeps the system working smoothly. Clean parts prevent blockages and mold growth that can harm your plants.
Monitoring Water Levels
Check the water reservoir daily or every few days. Look for signs of low water to refill promptly. A clear bottle helps you see the water level easily. If water runs out, plants may dry quickly. Refill the reservoir before it becomes empty. This keeps a steady water flow to the soil. Use clean water to avoid contaminating the system.
Cleaning The System
Clean the bottle and wick regularly to stop mold and bacteria. Remove the wick and soak it in warm water. Use mild soap if needed, then rinse well. Clean the bottle with water and a soft brush. Avoid harsh chemicals that can harm plants. Dry all parts before reassembling the system. Regular cleaning keeps water flowing freely and plants healthy.
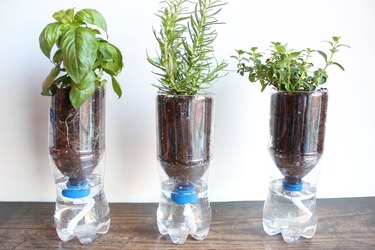
Alternative Designs
Alternative designs for self-watering systems offer simple and effective ways to keep your plants hydrated. These designs use everyday items and require minimal effort. They help maintain steady moisture for your plants without constant watering. Below are two easy methods that work well for different types of plants and setups.
Drip Cap Method
The drip cap method uses a plastic bottle with a small hole in the cap. Fill the bottle with water and screw the cap back on tightly. Invert the bottle and push it gently into the soil near the plant’s roots. Water drips slowly through the hole, providing a steady supply. This method controls water flow and prevents overwatering. It works well for both indoor and outdoor plants.
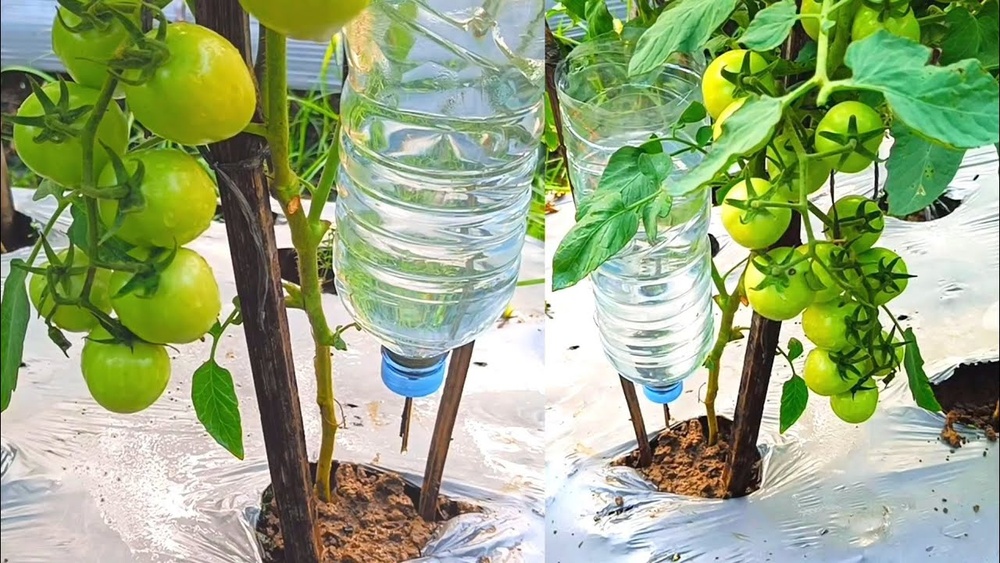
Upside-down Bottle Technique
The upside-down bottle technique is simple and effective. Fill a plastic bottle with water and poke small holes in the bottle’s neck or sides. Turn the bottle upside down and bury the neck in the soil. Water slowly seeps out through the holes, moistening the soil around the roots. This design is ideal for larger pots or garden beds. It helps keep soil consistently damp without daily watering.
Benefits For Plant Health
Using a self waterer for plants brings many health benefits. It supports steady growth and strong roots. Plants get the right amount of water at all times. This helps them stay healthy and vibrant.
Consistent Moisture
Plants need steady moisture to grow well. A self waterer keeps soil damp without drying out. It stops soil from becoming too wet or too dry. Consistent moisture helps roots absorb nutrients better. Plants stay hydrated longer and resist stress.
Reduced Overwatering Risks
Overwatering can harm plants and cause root rot. A self waterer gives water slowly and evenly. This lowers the chance of water buildup in soil. Roots get enough air and avoid drowning. Plants grow healthier with less chance of disease.
Troubleshooting Common Issues
Troubleshooting common issues helps keep your self-watering system working well. Small problems can stop water from reaching your plants. Fix these issues early to avoid dry soil and unhealthy plants.
Slow Or No Water Flow
Slow or no water flow often happens when the bottle hole clogs. Dirt or small debris can block the water path. Clean the hole with a pin or needle carefully. Check if the bottle sits higher than the soil. Water flows better with a slight height difference. Also, make sure the string or wick is wet. Dry wicks do not pull water properly.
Wick Drying Out
The wick may dry out if it is too thin or made from synthetic material. Use cotton or natural fibers for the wick. These materials absorb and transfer water well. Keep the wick deep inside the soil near the roots. This placement helps the wick stay moist longer. Re-soak the wick in water if it feels dry. Replace old wicks regularly to maintain water flow.

Credit: www.youtube.com
Frequently Asked Questions
How To Make A Self-watering Device For Plants?
Use a plastic bottle filled with water and a cotton string. Insert one end into the soil near roots, the other into the bottle. Alternatively, poke a small hole in the bottle cap, fill with water, invert, and insert into soil for slow dripping.
How Can I Automatically Water My Plants While On Vacation?
Use a plastic bottle with water and a cotton string or poke a hole in the cap. Insert it into the soil to drip water slowly. Adjust bottle height to control flow. This DIY self-watering system keeps plants hydrated during vacations.
How To Water Plants While Away For 3 Weeks?
Use a plastic bottle with a small hole in its cap filled with water. Invert and place it in soil near roots. Alternatively, insert a cotton string from the bottle water into the soil to wick moisture. Both methods provide slow, consistent watering for three weeks.
How To Keep Plants Watered When Away For 2 Months?
Use a DIY self-watering system with a water-filled plastic bottle and a cotton wick or slow-drip hole. Place it near plant roots to keep soil moist for two months.
Conclusion
Making a self-watering system helps keep plants healthy and hydrated. It saves time and reduces water waste. Using simple materials like plastic bottles and string keeps costs low. This easy method works well for beginners and busy gardeners. Try building one and see how your plants thrive with less effort.
Self-watering helps plants grow strong, even when you are away. Keep your garden green and happy with this simple tool.