Do It Yourself Plant Waterer: Easy Steps for Thriving Plants

Are you tired of forgetting to water your plants or worried about overwatering them? A Do It Yourself Plant Waterer could be the simple solution you need.
Imagine a system that waters your plants just the right amount, even when you’re busy or away. In this guide, you’ll learn how to create your own easy, affordable self-watering setup using everyday materials. Not only will this save you time and effort, but it will also help your plants grow healthier and stronger.
Ready to take control of your plant care and never worry about thirsty plants again? Keep reading to discover step-by-step instructions and tips to make your DIY plant waterer a success.
Benefits Of Diy Plant Waterers
DIY plant waterers offer many advantages for plant lovers. They help maintain the right moisture level in soil. This keeps plants healthy and thriving. Creating your own waterer is simple and cost-effective. It also saves time and effort in daily watering.
Consistent Moisture Supply
A DIY plant waterer provides a steady flow of water to plants. This steady moisture prevents soil from drying out quickly. Consistent moisture helps plants absorb nutrients better. It reduces stress on plants caused by irregular watering. Plants stay hydrated even during busy days or trips.
Reduced Watering Frequency
Using a DIY waterer means watering your plants less often. The waterer slowly releases water over time. This cuts down the need to check soil daily. Less frequent watering saves water and time. It is especially helpful for people with many plants or busy schedules.
Healthier Root Growth
Slow, steady watering encourages roots to grow deep and strong. Roots spread evenly in moist soil, improving plant stability. This reduces the risk of root rot from overwatering. Healthy roots help plants resist diseases and drought. A DIY waterer supports better root development naturally.
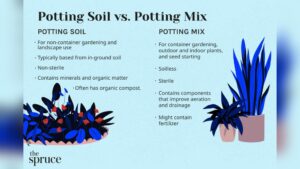
Materials Needed
Gathering the right materials is the first step to build a DIY plant waterer. The process is simple and requires items you might already have at home. Using common household objects keeps the project affordable and easy.
Some tools help make the process smoother and more precise. These specialized tools are optional but can improve your waterer’s efficiency and durability.
Common Household Items
- Empty plastic bottles (any size)
- Old cotton cloth or cotton balls
- Scissors or a sharp knife
- String or twine
- Sticks or chopsticks
- Rubber bands or tape
These items serve as the main parts of your waterer. Plastic bottles hold water, cotton helps control water flow, and sticks support the structure. Scissors and tape assist in shaping and securing parts together.
Specialized Tools
- Drill with small drill bits
- Hot glue gun
- Needle or pin for making tiny holes
- Measuring cup for water accuracy
Drills and needles create precise holes for water to drip slowly. A hot glue gun seals any leaks and strengthens connections. Measuring cups help you control water amounts easily.
Creating A Simple Drip System
Creating a simple drip system for your plants saves water and time. It gives plants a steady supply of moisture. This system is easy to make with items around the house. It works well for indoor and outdoor plants. The slow drip prevents overwatering and keeps the soil just right.
The process has three main steps. First, prepare the water container. Second, add the drip mechanism. Third, position the system for best results. Each step is quick and simple.
Preparing The Water Container
Choose a clean container like a plastic bottle or jar. Make sure it holds enough water for your plant’s needs. Remove any labels and clean the container well. Fill it with fresh water before starting the setup.
Adding The Drip Mechanism
Make a small hole near the bottom of the container. Use a needle or pin for this. Insert a cotton wick or a piece of cloth into the hole. This will control the water flow. Tape or seal the wick to keep it steady. The wick slowly releases water to the soil.
Positioning For Optimal Watering
Place the container higher than the plant pot. Gravity helps the water drip down. Position the wick so it touches the soil directly. Adjust the height to control drip speed. Check the system often to make sure water flows well.

Credit: www.youtube.com
Making A Self-watering Bottle
Making a self-watering bottle is a smart way to keep your plants hydrated. This simple DIY tool saves time and water. It works by slowly releasing water to the soil as the plant needs it. You can make one with just a few household items. Follow these easy steps to create your own self-watering bottle.
Selecting The Bottle
Choose a plastic bottle that holds at least one liter. A clear bottle helps you see the water level. Make sure it is clean and free from cracks. A bottle with a narrow neck works best for controlled water flow. Avoid bottles that are too large or too small for your plant’s pot.
Adding The Wick Or Stick
Use a cotton wick or a wooden stick as a water bridge. The wick draws water from the bottle to the soil. Insert the wick through the bottle cap or neck. If using a stick, tape it securely to the bottle’s side. The wick or stick should reach the soil but not touch the bottle bottom.
Filling And Setting Up
Fill the bottle with water, leaving some space at the top. Screw the cap back on tightly. Place the bottle upside down into the plant’s soil. Push the wick or stick gently into the soil. Check that water slowly seeps out to keep the soil moist. Refill the bottle as needed to keep your plant healthy.
Using Reservoir And Wick Systems
Using reservoir and wick systems is a smart way to water plants automatically. These systems supply water from a storage container directly to the plant’s roots. This method keeps soil moist without daily watering. It suits indoor plants, busy gardeners, or anyone wanting to save water. Simple materials can build these systems at home, making them affordable and eco-friendly.
How Reservoirs Work
A reservoir stores water below the plant pot. It holds enough water to feed the plant over time. The pot sits above or inside the reservoir, separated by a barrier. Water moves up from the reservoir into the soil through a wick or holes. This process provides steady moisture to the roots. It prevents water waste and root rot from overwatering. The reservoir refills less often than watering soil directly.
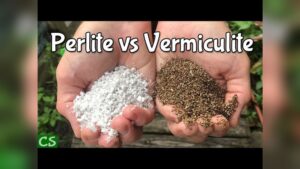
Choosing The Right Wick Material
The wick moves water from the reservoir to the soil. Its material affects how well water flows. Cotton strings work well because they absorb water easily. Nylon or polyester can also work but may dry out faster. Choose a wick thick enough to carry water but thin enough to fit in the pot. Test different wick sizes to find the best for your plants. Replace wicks that show mold or wear to keep the system clean.
Maintaining Steady Soil Moisture
Consistent moisture helps plants grow strong roots. The wick system supplies water slowly and evenly. Check soil moisture regularly with your finger or a moisture meter. Adjust the wick length or reservoir water level if soil feels too wet or dry. Clean the reservoir and wick every few weeks to avoid algae buildup. Proper maintenance keeps plants healthy and reduces watering stress.

Credit: londontolandgirl.com
Tips For Different Plant Types
Different plants have different water needs. Understanding these needs helps create a DIY plant waterer that works well for each type. This section shares simple tips for watering various plants effectively. Adjust your watering method to match the plant’s natural habitat and preferences. Doing this keeps your plants healthy and happy.
Water-loving Plants
Water-loving plants need consistent moisture in the soil. Use a waterer that delivers steady water flow. Keep the soil damp but not soggy. Good examples include ferns, peace lilies, and calatheas. Check the soil often and refill the water reservoir as needed. These plants thrive in high humidity and moist conditions.
Drought-tolerant Plants
Drought-tolerant plants survive with less water. They prefer soil that dries between watering. Ideal plants are lavender, rosemary, and some herbs. Set your waterer to release water slowly and less often. Avoid water buildup to prevent root rot. These plants do well in sunny, dry environments.
Adjusting Watering For Succulents And Cacti
Succulents and cacti store water in their leaves and stems. They need very little water to stay healthy. Use a waterer that gives small amounts at long intervals. Ensure the soil drains quickly and never stays wet. These plants prefer dry air and bright light. Watch for signs of overwatering, like soft or yellow leaves.
Common Issues To Avoid
Building your own plant waterer is a smart way to keep plants hydrated. Still, some common problems can affect your plants’ health and your system’s success. Avoiding these issues helps your DIY waterer work well and keeps plants growing strong.
Preventing Overwatering
Too much water harms roots and stops plants from growing. Use a slow drip or wick system to control water flow. Check soil moisture before adding more water. Choose containers that drain well to stop water buildup. Overwatering causes root rot and weak plants.
Avoiding Pest And Mold Growth
Stagnant water invites pests and mold near plants. Clean your water container often to stop germs. Use fresh water to reduce bacteria growth. Avoid water spills on leaves and soil surface. Keep your waterer in a sunny spot to prevent mold.
Monitoring Water Levels Regularly
Check water levels every few days to keep plants healthy. Fill your reservoir before it runs dry. Low water means plants can dry out fast. High water can cause overwatering problems. Keep a simple schedule to maintain steady moisture.

Credit: projecthub.arduino.cc
Diy Waterers For Indoor Gardening
DIY waterers for indoor gardening offer a simple way to keep plants hydrated without daily effort. They save time and reduce water waste. Building your own waterer can fit any space and plant type. Using easy materials, you can create a system that suits your needs perfectly.
Compact Designs For Small Spaces
Small homes and apartments need waterers that do not take much space. Compact designs fit on shelves, windowsills, and desks. Using small bottles or recycled containers works well. These waterers deliver water slowly and quietly. They keep plants healthy without cluttering your living area.
Integrating With Plant Pots
Some DIY waterers attach directly to plant pots. This makes watering more efficient. For example, placing a water bottle upside down in soil works well. The water drips slowly into the pot. Another method uses a wick to move water from a reservoir to soil. These ideas keep pots tidy and plants well-watered.
Automating Watering Schedules
Automation helps maintain consistent moisture levels. DIY timers and drip systems can water plants on a set schedule. This reduces the risk of overwatering or drying out. Simple devices like slow-release spikes or timer-controlled valves work great. Automation frees you from daily watering tasks.
Outdoor Diy Watering Solutions
Outdoor DIY watering solutions help keep garden plants healthy with less effort. These simple systems deliver water directly to roots. They save water and reduce daily watering tasks. Anyone can build them using easy-to-find materials. Such solutions work well for garden beds and pots.
These watering methods adapt to different outdoor spaces and plant needs. Planning for weather and the number of plants ensures success. Let’s explore how to customize these DIY waterers for your garden.
Adapting For Garden Beds
Garden beds need water spread evenly to reach all roots. Use perforated hoses or drip lines for slow watering. Place waterers deep enough to reach root zones. Adjust the flow rate based on soil type and plant size. Mulch helps keep moisture in the soil longer. Test your system to avoid dry spots or overwatering.
Weather Considerations
Outdoor watering depends on weather conditions. Hot, dry days require more frequent watering. Rainy days may need no extra water. Use timers or rain sensors to control watering times. Protect your waterers from strong winds or freezing temperatures. Regular checks ensure the system works well year-round.
Scaling Up For Multiple Plants
Large gardens need larger or multiple watering systems. Connect several drip lines to one water source. Use valves to control water flow for each section. Label lines to manage watering zones easily. Larger reservoirs reduce refilling frequency. This setup keeps all plants hydrated without waste.
Maintaining Your Diy Waterer
Maintaining your DIY plant waterer ensures it works well over time. Regular care keeps plants healthy and saves effort. Simple upkeep helps avoid clogs and keeps water flowing smoothly.
Cleaning Reservoirs
Empty the reservoir regularly to prevent algae growth. Use mild soap and water for cleaning. Rinse thoroughly to remove soap residue. Clean reservoirs help keep water fresh and plants healthy.
Replacing Wicks
Check the wick for wear or dirt. Replace it if it looks frayed or clogged. A clean wick delivers water evenly to the soil. Use cotton or synthetic wicks suitable for plant watering.
Seasonal Adjustments
Adjust watering frequency during different seasons. Plants need less water in winter and more in summer. Monitor soil moisture and adjust your waterer accordingly. Seasonal care prevents overwatering and keeps plants thriving.
Frequently Asked Questions
How To Make Homemade Plant Waterer?
Fill a plastic bottle with water and poke small holes in its cap. Insert a wick or cotton string through the holes. Place the bottle upside down in the plant soil to provide slow, consistent watering.
Do Self-watering Planters Actually Work?
Yes, self-watering planters use a reservoir and wick to supply consistent moisture, reducing watering frequency and promoting healthy roots. They suit many plants but not drought-tolerant types like succulents. Regular checks prevent pest and mold issues.
How To Water Plants While Away For 2 Weeks?
Use self-watering systems like drip bottles or wicking setups. Water thoroughly before leaving. Place plants in indirect light. Mulch soil to retain moisture. Ask a neighbor to check if possible.
What Is The Best Way To Self-water Plants?
The best way to self-water plants is using a reservoir and wick system. Fill the reservoir with water, and the wick draws moisture to the soil as needed, ensuring steady hydration and healthier roots while reducing watering frequency.
Conclusion
Building your own plant waterer saves time and money. It keeps plants hydrated without daily effort. Simple materials create a steady water supply for roots. This helps plants grow healthy and strong. Try this easy project to care for your plants better.
Enjoy gardening with less worry and more success.