How to Use Potato Grow Bags: Easy Steps for Bountiful Harvests
If you want to grow your own potatoes but don’t have much space or want an easier way to manage them, potato grow bags are the perfect solution for you. These simple, flexible bags let you grow healthy potatoes right on your patio, balcony, or backyard without the mess of traditional garden beds.
Using potato grow bags means less weeding, better drainage, and easy harvesting – all at your fingertips. In this guide, you’ll learn exactly how to use potato grow bags step-by-step, so you can enjoy fresh, homegrown potatoes with minimal effort.
Credit: beatyourneighbor.com
Choosing The Right Grow Bag
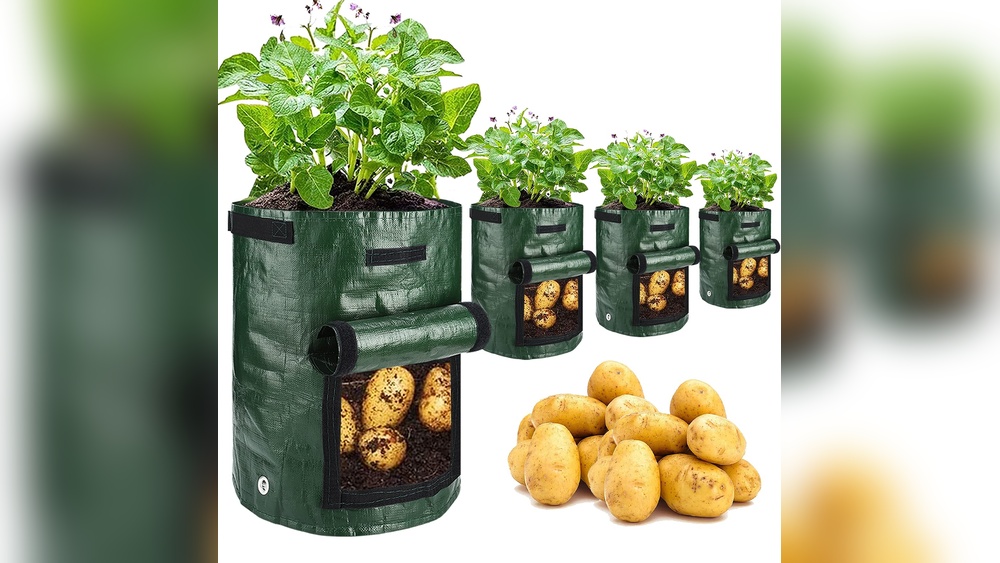
Choosing the right grow bag is key to a healthy potato harvest. The right bag supports growth and keeps your potatoes safe from pests and diseases. It also makes caring for your plants easier. Think about material, size, and drainage when picking your grow bag. Each factor helps your potatoes grow strong and healthy.
Material Options
Grow bags come in different materials like fabric, plastic, and felt. Fabric bags let air flow to the roots. This stops the soil from getting too wet. Plastic bags hold water longer but can cause root rot if not careful. Felt bags are soft and breathable. Choose a material that suits your climate and care style.
Size Considerations
Potatoes need space to grow. Small bags limit the number of potatoes you can plant. Larger bags allow more soil and room for tubers. A bag around 10 to 15 gallons works well for most potato types. Bigger bags also reduce the need to water often. Pick a size that fits your space and how many potatoes you want.
Drainage Features
Good drainage is important to stop water from pooling. Most fabric and felt bags drain well naturally. If using plastic, make sure the bag has holes. Waterlogged soil can rot potato tubers. Check for drainage holes or make some before planting. Drainage keeps roots healthy and plants growing strong.

Credit: www.superseeds.com
Preparing Grow Bags For Planting
Preparing grow bags for planting potatoes is a crucial step. It sets the foundation for healthy growth and a good harvest. Proper preparation ensures your potatoes get enough nutrients, water, and air. It also helps prevent problems like poor drainage or soil compaction. Follow these steps to get your grow bags ready.
Filling With Soil Mix
Start by choosing a light, loose soil mix. Use a blend of garden soil, peat moss, and sand. This mix holds moisture but drains well. Fill the grow bag about halfway with this soil. Avoid packing the soil tightly. Leave some space for roots to grow and for watering.
Adding Compost And Nutrients
Add compost to boost soil fertility. Compost provides natural nutrients and improves soil texture. Mix it evenly into the soil layer. You can also add a slow-release fertilizer. Use one made for vegetables. This helps potatoes grow strong and healthy. Avoid too much fertilizer, which can harm the plants.
Setting Up Drainage
Drainage is key to prevent waterlogging. Check that your grow bag has holes at the bottom. These let excess water escape. If needed, add a layer of small stones or broken pottery. Place this layer at the bottom of the bag. It helps keep the soil from becoming soggy. Good drainage stops roots from rotting and keeps plants happy.
Selecting And Preparing Seed Potatoes
Selecting and preparing seed potatoes is a key step for a successful potato harvest. Healthy, well-prepared seed potatoes grow strong plants that produce more tubers. Proper selection and preparation reduce the risk of disease and give your potatoes a great start.
Choosing Healthy Tubers
Pick seed potatoes that are firm and free from spots or cuts. Avoid soft or shriveled tubers as they may carry disease. Choose medium-sized tubers about the size of a chicken egg. Larger tubers can be cut, but smaller ones are best planted whole. Certified seed potatoes from garden centers offer the best chance for healthy plants.
Cutting And Curing
Cut large seed potatoes into pieces with one or two eyes each. Use a clean, sharp knife to make smooth cuts. Let the cut pieces dry for 2 to 3 days in a cool, dark place. This process is called curing. It helps form a protective layer over the cut surfaces. Curing prevents rot and disease during planting.
Pre-sprouting Techniques
Pre-sprouting speeds up potato growth. Place seed pieces in a light, cool spot for 1 to 2 weeks. Keep them at about 50-60°F (10-15°C). Small green shoots will appear from the eyes. Handle sprouts gently to avoid breaking them. Pre-sprouted potatoes grow faster and yield better crops.
Planting Potatoes In Grow Bags
Planting potatoes in grow bags is a simple way to grow fresh potatoes at home. Grow bags save space and help control soil conditions. They keep potatoes safe from pests and make harvesting easier. Follow these steps to plant potatoes correctly in grow bags for a healthy crop.
Initial Planting Depth
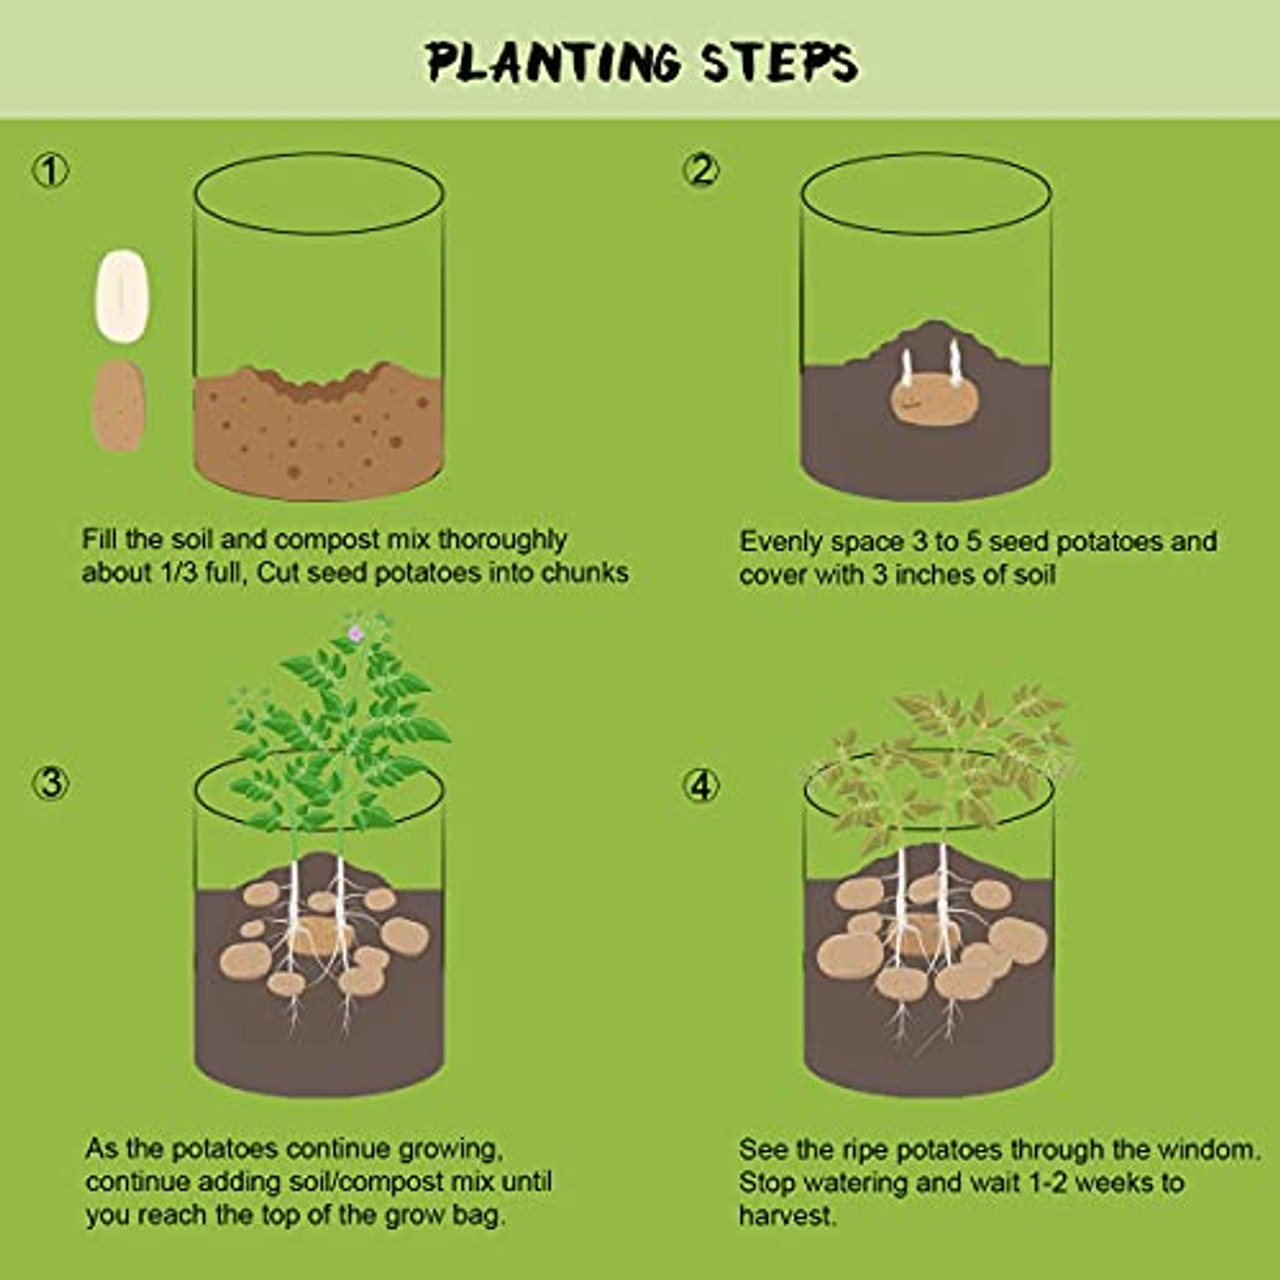
Start by filling the grow bag with 4 to 6 inches of loose soil. Place the seed potatoes on top of the soil. Plant the tubers about 4 inches deep. Cover them with soil gently. This depth protects the tubers and allows roots to grow strong.
Spacing Tubers
Space seed potatoes about 6 to 8 inches apart in the grow bag. This gives each tuber enough room to expand. Avoid crowding to prevent poor growth and disease. Good spacing helps air circulate and keeps the soil healthy.
Covering With Soil
After placing and spacing the tubers, cover them with 3 to 4 inches of soil. As the potato plants grow, add more soil to cover the stems. This process is called “hilling.” It encourages more tubers to form along the buried stems. Keep the soil loose and well-drained to avoid rot.
Watering Tips For Grow Bags
Proper watering is key for healthy potatoes in grow bags. These bags dry out faster than garden soil. Watering right helps roots grow strong and tubers develop well. Follow simple steps to keep soil moist but not soggy.
Checking Soil Moisture
Use your finger to test soil moisture. Push it about an inch into the soil. If it feels dry at that depth, it needs watering. If it feels damp, wait a day or two before checking again. This keeps the soil from staying too wet or too dry.
Watering Frequency Adjustments
Watering needs change with weather and plant growth. During hot, dry days, water more often, sometimes daily. When the weather is cool or rainy, water less. Increase watering when plants start flowering and tubers form. This phase needs steady moisture for good potato size.
Avoiding Overwatering
Too much water causes root rot and weak plants. Let water drain well from the grow bag’s holes. Avoid leaving the soil soggy or flooded. Water slowly and deeply to reach all roots, then stop once excess water drains. Keep leaves dry to prevent diseases.
Hilling Up Potatoes In Bags
Hilling up potatoes in grow bags is a simple but important step. It helps protect the tubers and encourages better growth. This process means adding soil around the stems as the plants grow taller. It keeps the potatoes covered and safe from sunlight.
When To Hill
Start hilling when the potato plants reach about 6 to 8 inches tall. At this point, the stems are strong enough to hold more soil. Check your plants every few days. Add soil before the stems get too tall and fall over.
How To Add Soil
Gently open the grow bag around the plant. Add soil or compost to cover the lower part of the stems. Do not bury the whole plant. Leave some green leaves above the soil. Fill the bag in layers as the plant grows taller.
Benefits For Tuber Growth
Hilling keeps the tubers in the dark, preventing them from turning green. It also gives them more space to grow. This leads to bigger and healthier potatoes. The extra soil helps retain moisture and supports root development. Overall, hilling improves your potato harvest quality.
Fertilizing During Growth
Fertilizing during the growth of potatoes in grow bags is vital for a healthy harvest. Proper nutrients help the plants develop strong stems and produce more tubers. Without enough fertilizer, potatoes may grow slowly or yield fewer potatoes.
Understanding the nutrient needs, types of fertilizers, and the right time to apply them ensures better results. This guide explains how to fertilize potatoes effectively in grow bags.
Nutrient Needs
Potatoes need nitrogen, phosphorus, and potassium. Nitrogen helps leaves grow green and strong. Phosphorus supports root and tuber development. Potassium improves tuber size and disease resistance. Trace minerals like calcium and magnesium also support growth. Balanced nutrients lead to healthy plants and good yields.
Types Of Fertilizers
Use slow-release or organic fertilizers for steady feeding. Compost or well-rotted manure adds natural nutrients. A balanced fertilizer with an N-P-K ratio like 10-10-10 works well. Avoid too much nitrogen to prevent leafy plants with few potatoes. Liquid fertilizers can give a quick boost during growth.
Application Timing
Start fertilizing when shoots appear above soil. Feed again when flowers form to support tuber growth. Avoid feeding late in the season to let tubers mature. Apply fertilizer evenly around the base, not on leaves. Water after fertilizing to help nutrients reach roots.
Pest And Disease Management
Managing pests and diseases is vital for healthy potatoes in grow bags. These issues can reduce yield and spoil your crop. Spotting problems early helps protect your plants. Using the right methods keeps potatoes strong and productive.
Common Issues
Potatoes in grow bags often face pests like aphids, potato beetles, and wireworms. Diseases include blight, scab, and blackleg. Aphids suck plant sap, causing leaves to curl and yellow. Potato beetles eat leaves, weakening plants. Blight shows as dark spots on leaves and stems. Scab creates rough patches on tubers. Blackleg causes stems to rot and wilt.
Preventive Measures
Choose disease-free seed potatoes to start. Use fresh, well-drained soil in your grow bags. Space bags to allow air circulation and reduce moisture. Water at the base to keep leaves dry. Remove dead or diseased leaves quickly. Rotate crops each season to avoid soil-borne diseases. Inspect plants regularly for early signs of pests or illness.
Organic Control Methods
Use insecticidal soap to control aphids safely. Handpick potato beetles and destroy them. Introduce beneficial insects like ladybugs to eat pests. Spray neem oil to deter many common bugs. Apply copper-based fungicides to manage blight. Dust tubers with baking soda or flour to reduce scab. Compost tea sprays help improve plant health and fight disease naturally.
Harvesting Potatoes From Grow Bags
Harvesting potatoes from grow bags is an exciting moment for any gardener. These bags make it simple to grow and collect potatoes, even in small spaces. Knowing when and how to harvest ensures you enjoy fresh, tasty potatoes from your own garden. The process involves spotting maturity signs, using proper techniques, and storing the potatoes correctly to keep them fresh.
Signs Of Maturity
Potatoes are ready to harvest when the plant leaves start to yellow and die back. This usually happens 10 to 12 weeks after planting. The flowers on the plants may fade or drop off. Gently feel the size of the tubers by opening the grow bag slightly. If the potatoes feel firm and large enough, they are mature. Avoid harvesting too early to get full-sized potatoes.
Harvest Techniques
To harvest, carefully tip the grow bag on its side. Gently shake the soil to loosen potatoes. Use your hands to pick out the tubers without damaging them. Avoid using sharp tools that can cut the potatoes. Remove all potatoes, even small ones, as they can grow bigger later. Check the bag’s bottom to find any missed tubers.
Storing Harvested Potatoes
Store potatoes in a cool, dark, and dry place. Avoid direct sunlight to prevent greening. Use a burlap sack or cardboard box for storage. Keep them away from onions, which can cause potatoes to spoil faster. Do not wash potatoes before storing; brush off excess dirt instead. Check stored potatoes regularly and remove any that start to rot.

Credit: kidsactivitiesblog.com
Maximizing Yield Tips
Maximizing the yield of potatoes in grow bags requires smart care and attention. Small changes can make a big difference in the size and number of your potatoes. Understanding key factors such as light, temperature, and soil health helps plants grow strong. Follow these tips to get the best harvest from your potato grow bags.
Optimizing Sunlight
Potatoes need at least six hours of direct sunlight daily. Place your grow bags in a bright spot. Avoid shaded areas to keep plants healthy. Sunlight helps produce more tubers and improves their quality. Rotate the bags occasionally to expose all sides to light. This prevents uneven growth and supports strong stems.
Temperature Control
Potatoes grow best in cool weather between 60°F and 70°F. Keep grow bags away from extreme heat or cold. In hot climates, move bags to shaded areas during peak afternoon sun. Use mulch on top of the soil to keep moisture and regulate temperature. Protect plants from frost by covering bags with cloth or moving them indoors.
Crop Rotation Ideas
Avoid planting potatoes in the same soil each season. Crop rotation reduces pests and diseases. Rotate with plants like beans, lettuce, or carrots. These crops improve soil nutrients and break pest cycles. After potatoes, give your grow bags a rest or plant green manure. This keeps the soil healthy for future crops.
Conclusion
Using potato grow bags makes planting simple and space-friendly. These bags help you control soil quality and drainage well. Water your potatoes carefully, keeping the soil moist but not soggy. Check soil often, especially during hot days, to avoid drying out.
Place bags where they get enough sunlight for healthy growth. Harvest when the leaves turn yellow and die back. Grow bags suit small gardens, patios, or balconies perfectly. Enjoy fresh potatoes with less effort and great results. Try potato grow bags and watch your garden thrive easily.