How to Build a Self Watering Planter: Easy DIY Guide for Thriving Plants

Are you tired of constantly worrying about whether your plants are getting enough water? Imagine a planter that takes care of watering itself, so you don’t have to stress over daily maintenance or forget to water when life gets busy.
Building your own self-watering planter is easier than you think, and it can transform the way you care for your plants. In this guide, you’ll discover simple steps to create a self-watering system that keeps your plants healthy and thriving with minimal effort from you.
Ready to save time, conserve water, and enjoy greener, happier plants? Let’s dive in and build your perfect self-watering planter!
Benefits Of Self Watering Planters
Self watering planters offer many advantages for gardeners of all skill levels. They help plants get the right amount of water without constant attention. These planters create a balanced environment for healthy growth. They save time and resources, making gardening easier and more enjoyable.
Consistent Water Supply
Self watering planters keep soil moist evenly. They deliver water directly to the roots. Plants avoid stress caused by dry or soggy soil. This steady water supply helps plants grow stronger and healthier.
Improved Plant Health
Plants absorb water as they need it. This reduces the risk of overwatering or underwatering. Roots get enough air and moisture. Strong roots lead to vibrant leaves and blooms. Self watering planters support a healthy root system.
Water Conservation
These planters use water efficiently with less waste. Water stays in the reservoir until plants need it. This system reduces evaporation and runoff. Gardeners save water while keeping plants hydrated. It is an eco-friendly choice for all gardeners.
Convenience For Busy Schedules
Self watering planters reduce the need for daily watering. They allow plants to thrive during short absences. Gardeners save time on plant care routines. Perfect for those with busy lives or frequent travel. Plants stay healthy without constant monitoring.
Key Components
Building a self-watering planter involves understanding its key components. These parts work together to keep plants hydrated without daily watering. Each component plays a vital role in maintaining healthy plant growth. Let’s explore the essential elements you need for a successful self-watering planter.
Water Reservoir
The water reservoir stores water at the base of the planter. It holds enough water to keep the plant hydrated for days or weeks. This reservoir prevents water from touching the soil directly, reducing the risk of root rot. A well-designed reservoir makes watering less frequent and more efficient.
Wicking System
The wicking system moves water from the reservoir to the soil. It uses a wick made from fabric, rope, or similar material. The wick pulls water up using capillary action, keeping the soil moist. This system ensures the plant gets water as it needs, avoiding overwatering or drying out.
Soil And Root Interaction
The soil and roots work together to absorb water delivered by the wick. The soil must be well-draining and loose to allow roots to grow freely. Healthy roots take in just the right amount of water. This balance helps plants stay healthy and reduces water waste.
Materials Needed
Building a self-watering planter starts with gathering the right materials. These materials create a system that keeps your plants hydrated with minimal effort. Choosing the correct items ensures your planter works efficiently. Below are the essential materials to prepare before you begin.
Containers And Reservoirs
Select two containers for this project. One will hold the soil and plant. The other will serve as a water reservoir. Use plastic or ceramic pots that fit inside each other. The bottom container stores water. The top container holds soil and plants. Make sure the top container has drainage holes. This setup allows water to move up to the plant roots.
Wicking Materials
The wick moves water from the reservoir to the soil. Cotton rope or strips of old t-shirt fabric work well. The wick must be absorbent and long enough to reach both containers. It draws water through capillary action. This keeps the soil moist without flooding it. Avoid synthetic materials that do not absorb water easily.
Tools And Accessories
Some basic tools make the build easier. A drill or sharp knife creates drainage holes. Scissors cut the wick material to size. A ruler or tape measure helps with precise fitting. You may also need waterproof glue or tape to secure parts. Gloves protect your hands while working with soil and tools.

Credit: www.youtube.com
Step-by-step Building Process
Building a self-watering planter is simple and fun. This step-by-step guide will help you create one easily. Each step is clear and easy to follow. You will need some basic materials and a little time. Let’s start the process to make your planter work well and save water.
Preparing The Container
Choose a sturdy container with no cracks. Clean it thoroughly to remove dirt and dust. Drill a few holes near the bottom for drainage. These holes help excess water escape. Make sure the container is large enough for your plants.
Creating The Reservoir
Use a smaller container or a plastic bottle as a water reservoir. Place it inside the main container at the bottom. The reservoir stores water to keep the soil moist. Leave some space above for soil and plant roots. Make sure the reservoir fits well without tilting.
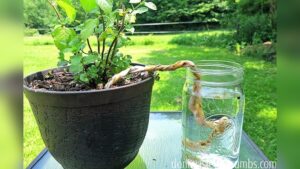
Installing The Wick
Cut a piece of cotton or nylon rope for the wick. Insert one end of the wick into the reservoir. The other end should reach the soil above. The wick will draw water up to the roots slowly. Make sure the wick is long enough to touch both water and soil.
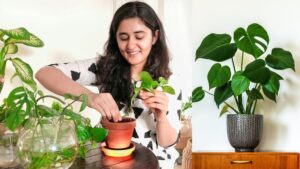
Adding Soil And Plants
Fill the container with potting soil around the reservoir and wick. Press the soil gently to remove air pockets. Plant your seeds or seedlings in the soil. Water the soil lightly to help roots settle. Choose plants that like consistent moisture for best results.
Filling And Testing Water Levels
Pour water into the reservoir through the container’s top. Check the wick to see if it is wetting the soil. Add more water if the soil feels dry. Keep an eye on the water level regularly. Refill the reservoir as needed to keep plants healthy.
Plant Selection Tips
Choosing the right plants for your self watering planter is key to its success. Not all plants thrive with constant moisture, so selecting suitable ones ensures healthy growth. Understanding plant preferences helps you avoid problems like root rot or wilting. This section covers the best plants to use, which to avoid, and how to adjust care for different needs.
Ideal Plants For Self Watering Planters
Plants that enjoy steady moisture work best in self watering planters. Herbs like basil, mint, and parsley grow well with consistent water. Leafy greens such as lettuce, spinach, and kale also thrive. Many tropical plants like ferns and peace lilies prefer moist soil. These plants benefit from the reliable water supply, reducing your watering effort.
Plants To Avoid
Some plants need dry soil between waterings. Succulents and cacti dislike constant moisture and may rot. Lavender and rosemary prefer well-drained soil and dry roots. Avoid plants prone to root rot or fungal diseases in wet soil. Choosing these plants can cause frustration and poor growth in self watering planters.
Adjusting For Plant Needs
Not all plants have the same water requirements. Use soil mix with better drainage for plants that need less moisture. Monitor the water reservoir to prevent overwatering. Group plants with similar water needs together. Adjust watering frequency based on plant size and weather conditions. Proper adjustment keeps plants healthy and thriving.
Maintenance And Troubleshooting
Maintaining your self-watering planter ensures healthy plants and long-lasting use. Regular checks help you catch problems early. This section covers simple steps to keep your planter working well. Follow these tips to enjoy thriving plants with less effort.
Refilling The Reservoir
Check the water reservoir often. Keep it filled to allow constant water supply. Use clean water to avoid buildup of dirt or algae. Avoid letting the reservoir dry out completely. Set a reminder to refill every few days. This keeps soil moist and plants happy.
Preventing Root Rot
Root rot happens when roots sit in water too long. Make sure the soil drains well but stays moist. Use a well-draining soil mix in your planter. Avoid overfilling the reservoir to prevent excess moisture. Check roots if plants look weak or yellow. Remove any rotten roots to save the plant.
Handling Overwatering
Too much water can harm your plants. If leaves turn yellow or soft, reduce water supply. Check the reservoir level and soil moisture regularly. Allow the soil surface to dry slightly between waterings. Improve airflow around the planter to help dry excess moisture. Adjust watering frequency based on weather and plant needs.
Seasonal Care Tips
Plants need different care during seasons. In hot weather, refill the reservoir more often. During cooler months, water less frequently. Move the planter indoors if frost is expected. Clean the reservoir and planter yearly to remove algae and debris. Trim dead leaves and check for pests regularly.
Diy Variations And Upgrades
DIY self-watering planters offer a smart way to keep plants hydrated. You can customize these planters with various upgrades. These changes improve function and fit your garden style. Explore creative ideas to enhance your planter’s efficiency and size.
Using Recycled Materials
Reuse old containers like plastic bottles or buckets. These save money and reduce waste. Cut holes for drainage and a water reservoir. Paint or decorate to improve appearance. Recycled materials make the project eco-friendly and unique.
Adding Drip Irrigation
Install a simple drip system for steady water flow. Connect small tubes from the reservoir to the soil. This controls water release and prevents overwatering. Use a timer to automate watering times. Drip irrigation keeps plants healthy with less effort.
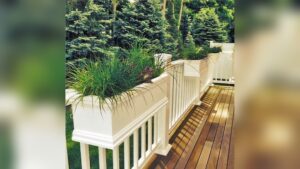
Creating Larger Planter Beds
Build bigger beds to grow more plants at once. Use wood or sturdy containers to hold soil and water. Make a large reservoir beneath for consistent moisture. Layer soil with good drainage materials. Larger beds suit vegetable gardens or multiple flowers.

Credit: www.anikasdiylife.com
Frequently Asked Questions
Can I Make My Own Self-watering Planter?
Yes, you can make your own self-watering planter using household containers and simple materials. It ensures consistent watering and reduces plant care effort.
Do Self-watering Planters Really Work?
Yes, self-watering planters work by providing consistent moisture through a built-in reservoir, reducing over- and under-watering. They suit many plants, save water, and require less frequent watering but may not suit drought-tolerant plants or outdoor use in heavy rain.
What Are The Drawbacks Of Self-watering Pots?
Self-watering pots may cause root rot in drought-loving plants. They can overwater some species and lack rain control outdoors. These pots often cost more upfront and offer limited moisture adjustment.
Do You Put Rocks In The Bottom Of A Self-watering Planter?
No, avoid placing rocks at the bottom of a self-watering planter. They can block water flow and reduce reservoir efficiency. Use a wicking system or a water reservoir designed for proper moisture distribution instead. This ensures consistent watering and healthier plant roots.
Conclusion
Building a self-watering planter is simple and practical. It saves time and keeps plants healthy. Your plants get water when they need it. This reduces the chance of over- or underwatering. You can use common materials to create your planter.
It works well for many indoor and outdoor plants. Try making one to enjoy easier plant care. You will likely see your plants grow stronger and happier. A self-watering planter makes gardening less stressful and more fun.