How to Make a Plant Self Waterer: Easy DIY Guide for Thriving Plants

Are you tired of constantly worrying about watering your plants? What if you could create a simple device that keeps your plants hydrated even when you’re busy or away?
Making a plant self-watering system is easier than you think, and it can save you time, money, and stress. In this guide, you’ll discover step-by-step how to build your own self-watering setup using everyday items. Imagine coming home to healthy, thriving plants without lifting a finger—let’s make that happen! Keep reading to unlock the secret to hassle-free plant care.

Credit: www.youtube.com
Materials Needed
Creating a plant self-watering system requires a few simple materials. These items help deliver water steadily to your plants. You can find most of them at home or a local store. Preparing the right materials makes the building process easier and more effective.
Plastic Bottles And Containers
Use empty plastic bottles for water storage and slow release. Choose bottles with a secure cap to control water flow. You can also use recycled containers that hold water well. Clear bottles let you see the water level easily.
Wicking Materials
Wicks draw water from the container to the soil. Cotton strings or strips of cloth work well as wicks. Avoid synthetic fibers that may not absorb water properly. The wick should be long enough to reach both water and soil.
Tools And Accessories
Basic tools help prepare the bottles and set up the system. Use a sharp knife or scissors to cut bottles safely. A pin or needle can create tiny holes for water drip. A small funnel makes filling bottles easier and less messy.

Credit: www.youtube.com
Bottle Drip System
The Bottle Drip System is a simple way to keep plants watered steadily. It uses a plastic bottle to slowly release water into the soil. This system helps plants get water over time without daily watering. It works well for indoor plants and garden beds alike. Follow these steps to make your own bottle drip system.
Preparing The Bottle
Choose a clean plastic bottle, usually 1 or 2 liters. Remove the label and rinse the bottle well. Cut off the bottle cap carefully. Keep the bottle and cap ready for the next step. Avoid bottles with cracks or damage.
Creating Drainage Holes
Use a small nail or pin to make holes in the bottle cap. Make 3 to 5 tiny holes for slow dripping. Check that holes are not too big to avoid fast water flow. If needed, add a few holes near the bottle’s bottom for air release. This allows water to drip evenly.
Installing The Bottle In Soil
Dig a small hole near the plant’s roots. The hole should be deep enough to hold the bottle upside down. Insert the bottle with the cap facing down into the soil. Press soil gently around the bottle to hold it firm. Make sure the holes in the cap are covered by soil.
Filling And Using The Drip System
Fill the bottle with clean water slowly to avoid spills. Replace the cap tightly to control dripping. The water will drip out slowly into the soil. Refill the bottle as water level goes down. This system waters plants for several days automatically.
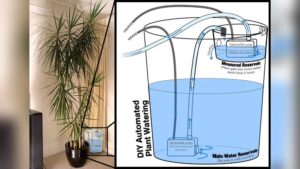
Wicking System Setup
Setting up a wicking system is a smart way to keep your plants watered automatically. This system uses a string or wick to draw water from a reservoir into the soil. It works by capillary action, ensuring plants get water slowly and steadily. The setup is simple, effective, and great for busy plant owners.
Choosing The Right String
Select a string made of natural fibers like cotton or wool. These materials absorb and transfer water well. Avoid synthetic strings; they do not wick water effectively. The string should be thick enough to hold moisture but thin enough to fit through the pot’s drainage hole. A piece about 12 inches long usually works best.
Positioning The Water Reservoir
Place a water container beside or below your plant pot. The reservoir must be stable and easy to refill. The container size depends on the plant’s water needs and how long you want it to stay watered. Make sure the top of the reservoir is lower than the soil surface to help the water flow up the wick.
Setting Up The Wick
Insert one end of the string into the water reservoir. Let the other end reach deep into the soil near the plant’s roots. The wick should touch both the water and the soil. Check that the wick stays moist and does not dry out. If the string is too short, the plant may not get enough water.
Maintaining Water Levels
Check the water reservoir regularly to keep it filled. Low water levels stop the wicking action, leaving plants dry. Refill the container before it runs empty. Clean the reservoir occasionally to avoid algae growth. Proper water maintenance ensures your self-watering system works well over time.

Credit: scissorsandsage.com
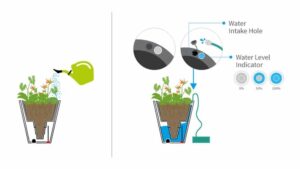
Diy Self-watering Pots
DIY self-watering pots help plants stay hydrated without daily care. They save time and reduce water waste. Making these pots at home is simple and affordable. Use materials you already have to keep plants healthy and happy. Below are easy ways to create your own self-watering pots.
Modifying Existing Pots
Start with a regular pot that has drainage holes. Seal some holes near the bottom using waterproof glue or tape. Leave one or two holes open for water flow. Place a small container or tray underneath to catch excess water. This setup slows water loss and keeps soil moist longer. It also prevents overwatering and root rot.
Adding Reservoirs
Add a water reservoir below or inside the pot. Use a plastic bottle or container to hold water. Cut the bottle in half and invert the top inside the bottom part. Fill the bottom with water and place soil and plant above. The soil will draw water slowly from the reservoir by capillary action. This method provides steady moisture without flooding roots.
Using Pvc Pipes For Irrigation
Cut PVC pipes to fit inside or beside the pot. Drill small holes along the pipe length for water release. Connect the pipe to a water source or reservoir. Bury the pipe in soil to deliver water directly to roots. This system controls water flow and reduces evaporation. It works well for larger pots or garden beds.
Tips For Best Results
Creating a plant self-watering system can save time and keep your plants healthy. To get the best results, follow some key tips. These tips help your system work efficiently and keep your plants thriving.
Choosing Suitable Plants
Pick plants that like consistent moisture. Herbs like basil and mint work well. Also, small houseplants such as pothos or spider plants fit perfectly. Avoid plants that prefer dry soil, like succulents. Matching the plant to the watering system helps prevent overwatering.
Adjusting Water Flow
Control how fast water moves into the soil. For a bottle drip system, use small holes for slow release. Larger holes may flood the soil, hurting roots. For a wick system, select a thick string for faster flow. Test and adjust to find the perfect flow rate for your plant.
Monitoring Soil Moisture
Check soil moisture regularly. Use your finger to feel the soil about an inch deep. If it feels dry, add more water to the reservoir. Too much water can cause root rot. Keeping soil moisture balanced is key to healthy growth.
Troubleshooting Common Issues
Troubleshooting common issues helps keep your plant self-waterer working well. Small problems can stop water flow or harm your plant. Spotting these issues early saves time and plants.
Clogged Drip Holes
Drip holes can get blocked by dirt or plant debris. This stops water from reaching the soil. Use a small pin or needle to clear the holes gently. Check the holes often, especially if water flow slows down.
Wick Drying Out
The wick moves water from the reservoir to the soil. If it dries out, the plant won’t get water. Make sure the wick stays wet by placing it deep in the water container. Replace the wick if it looks worn or moldy.
Overwatering Signs
Too much water can hurt your plant’s roots. Look for yellow leaves or soft, mushy stems. Soil that feels very wet or smells bad also means overwatering. Reduce water supply or fix leaks in your self-watering system.
Eco-friendly Practices
Creating a plant self-watering system helps save water and supports the environment. Using eco-friendly materials reduces waste and pollution. Simple steps can make your garden greener and more sustainable. Here are some key eco-friendly practices for making a self-watering planter.
Recycling Plastic Bottles
Old plastic bottles make perfect water reservoirs for self-watering systems. Cut and repurpose them instead of throwing them away. This reduces plastic waste in landfills and oceans. Use bottles of different sizes to fit your plant pots. Small holes allow water to drip slowly into the soil. Recycling saves money and helps the planet.
Using Natural Fibers For Wicks
Natural fibers like cotton or jute work well as wicks in self-watering setups. They absorb water and slowly release it to plant roots. Avoid synthetic materials that may contain harmful chemicals. Natural fibers break down safely over time. They also improve water flow and keep soil moist. This method is gentle on plants and the environment.
Reducing Water Waste
Self-watering systems use water efficiently by delivering it directly to roots. This prevents water loss from evaporation or runoff. Fill the reservoir only as needed to avoid overflow. Check the system regularly to fix leaks or blockages. Using rainwater instead of tap water adds another eco-friendly layer. Reducing water waste saves resources and supports healthy plant growth.
Frequently Asked Questions
How Do You Automatically Water Plants While Away?
Use a plastic bottle with small holes as a drip system or a water container with a wick string. Both release water slowly to keep plants hydrated while away.
How To Keep Plants Watered When Away For 2 Months?
Use a DIY self-watering system like a bottle drip or water-wicking setup. Both release water slowly and keep soil moist. Place a water container near plants with a string to draw moisture. Alternatively, ask someone to water your plants regularly while you’re away.
How To Make A 5 Gallon Self-watering Container?
To make a 5-gallon self-watering container, cut a plastic bottle in half. Place the top inverted inside the bottom. Fill the bottom with water. Insert a wick through the bottle neck into the soil. Fill the soil and plant your greenery.
What Kind Of String To Use For Self-watering Planter?
Use cotton or nylon wick string for self-watering planters. These materials absorb and transfer water efficiently to the soil. Avoid synthetic strings that repel water. Choose a thickness that fits your planter’s water reservoir and soil needs for steady moisture delivery.
Conclusion
Creating a plant self-watering system saves time and helps plants stay healthy. It uses simple materials like bottles and string. This setup gives plants water slowly and steadily. It works well for busy gardeners or when away from home. Anyone can build it with easy steps and little cost.
Try making one to keep your plants happy and growing. Simple tools can make a big difference in plant care. Start today and enjoy stress-free watering.