How to Make Self Waterer for Plants: Easy DIY Guide to Save Time
Are you tired of constantly worrying about watering your plants? Whether you’re often busy or just want to make plant care easier, a self-watering system can be a game-changer.
Imagine your plants getting just the right amount of water—even when you forget or are away. In this guide, you’ll learn simple, practical ways to make your own self waterer for plants using things you probably already have at home.
From a clever bottle drip method to a natural wicking system, you’ll discover easy DIY solutions that save you time and keep your plants healthy. Ready to make watering hassle-free? Let’s dive in!

Credit: www.frugalupstate.com
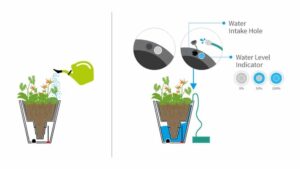
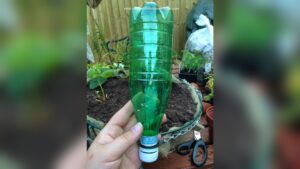
Bottle Drip Method
The Bottle Drip Method is a simple way to keep plants watered automatically. It uses a plastic bottle that slowly releases water into the soil. This method works well for indoor and outdoor plants. It saves time and helps plants stay healthy. The water drips at a steady rate, providing moisture without flooding the soil.
Materials Needed
- Plastic bottle (500 ml or larger)
- Small nail or pin
- Q-tip or thin stick
- Water
- Scissors or knife
- Tape (optional)
Step-by-step Instructions
- Clean the plastic bottle and remove the label.
- Use the nail to make a small hole in the bottle cap.
- Insert the Q-tip or thin stick through the hole in the cap.
- Fill the bottle with water.
- Screw the cap back on tightly.
- Turn the bottle upside down.
- Push the Q-tip end gently into the soil near the plant roots.
- Use tape to secure the bottle in place if needed.
Adjusting The Drip Rate
The drip rate depends on the size of the hole and Q-tip thickness. A smaller hole or thicker Q-tip slows the drip. A larger hole or thinner Q-tip speeds it up. Test the drip for a few hours to see how fast water flows. Move the bottle or adjust the Q-tip to control the water flow. This helps prevent overwatering or underwatering your plants.
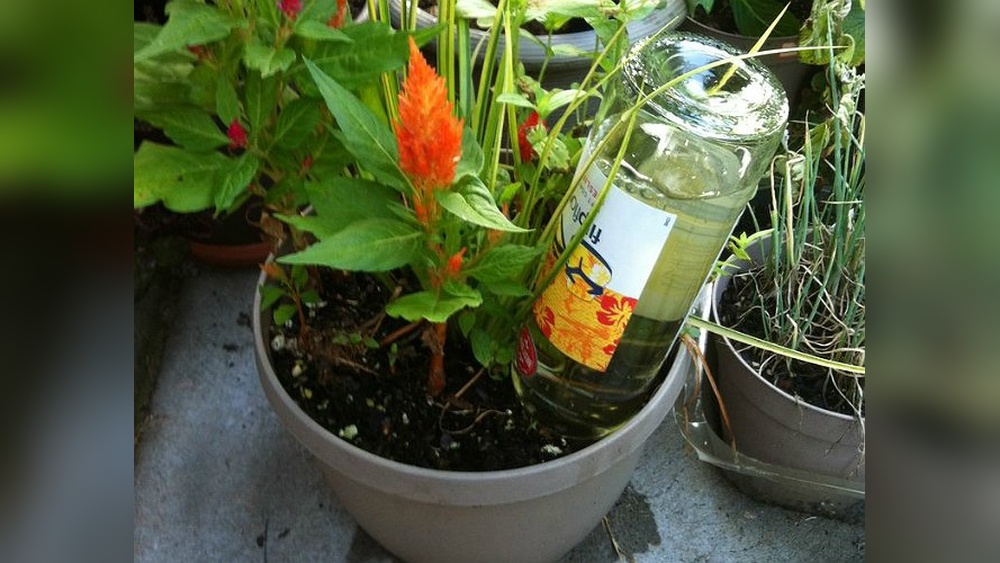
Wicking Method
The wicking method is a simple and effective way to keep plants watered automatically. This method uses a piece of fabric or rope to transfer water from a reservoir directly to the plant’s soil. It works quietly and without electricity. The plant receives water as it needs it, reducing the risk of overwatering or underwatering.
This method suits small to medium-sized plants. It is perfect for indoor plants or garden beds where you want a steady water supply. The wicking method also saves time and helps maintain healthy soil moisture.
Required Supplies
- A water reservoir (a bucket, jar, or container)
- A piece of cotton rope, thick yarn, or absorbent fabric strip
- A plant pot with soil
- Water
- Scissors (to cut the rope or fabric)
Setup Process
- Cut a 12- to 18-inch piece of cotton rope or fabric strip.
- Place one end of the rope into the water reservoir.
- Insert the other end of the rope deep into the plant’s soil.
- Make sure the rope stays damp inside the reservoir and soil.
- Fill the reservoir with water. Check it regularly and refill as needed.
The rope will slowly pull water up from the reservoir to the soil. This keeps the soil moist without flooding it.
How Capillary Action Works
Capillary action is the process that moves water through the rope. Water molecules stick to the fibers of the rope. Then they pull other water molecules along with them.
This movement is slow and steady. It matches the plant’s water needs. The soil draws water through the rope when it starts to dry out. This natural process keeps plants healthy and hydrated.
Electronic System
The electronic system adds smart control to your self-watering plant setup. It automates watering based on soil moisture levels. This system saves water and keeps plants healthy without daily attention.
With basic electronics and simple programming, you can build an efficient watering system. It uses sensors to check soil wetness and triggers water flow only when needed. This section covers all steps to create your own electronic self-watering system.
Components List
- Microcontroller (Arduino or similar)
- Soil moisture sensor
- Water pump or solenoid valve
- Relay module to control pump
- Power supply (battery or adapter)
- Connecting wires
- Breadboard or PCB for assembly
- Water reservoir container
Wiring And Assembly
Start by connecting the soil moisture sensor to the microcontroller’s analog input. Attach the relay module to a digital output pin. Connect the water pump’s power line through the relay to control it.
Ensure the power supply matches the pump’s requirements. Use a breadboard to test connections. Double-check wiring to avoid short circuits. Secure all parts inside a waterproof box near the plant.
Programming The Controller
Write a simple program to read the sensor’s values continuously. Set a moisture threshold to decide when to water. If the soil is dry, activate the relay to turn on the pump.
Run the pump for a fixed time to avoid overwatering. Add a delay before the next sensor reading to save power. Upload the code to your microcontroller using its software.

Credit: www.youtube.com
Tips For Best Results
To achieve the best results with your self-watering system, pay close attention to placement and regular care. Proper setup ensures plants receive the right amount of water consistently. Simple maintenance keeps the system working smoothly and prevents common problems.
Placement And Maintenance
Place the self-watering system in a spot with good light but not direct harsh sunlight. This prevents water from evaporating too fast. Keep the water reservoir filled to avoid drying out the soil. Check the water level daily, especially in hot weather.
Clean the bottle or container every two weeks. This stops algae and mold growth. Clear any clogged holes or tubes gently with a pin or needle. Trim the wick or replace it if it starts to break down. Well-maintained parts last longer and work better.
Troubleshooting Common Issues
If plants look dry, check if water is flowing properly. The drip hole or wick might be blocked. Adjust the size of the hole or wick thickness for better water flow. If soil stays too wet, the hole may be too big or water reservoir too full. Reduce water or make the hole smaller.
Watch for signs of root rot like yellow leaves or bad smell. Remove excess water and improve drainage if needed. If algae grows in the water, clean the container more often and keep it out of direct sun. Proper care keeps your self-watering system effective and your plants healthy.
Benefits Of Self-watering
Self-watering systems offer many benefits for plant care. They help maintain consistent moisture in the soil. This keeps plants healthier and happier. These systems also make watering easier and less time-consuming. Using a self-watering method can improve your gardening experience and plant growth.
Time Savings
Self-watering saves you time. You do not need to water plants every day. The system provides water slowly and steadily. This means fewer daily tasks for you. It is great for busy people or those who travel. You can focus on other activities while plants stay hydrated.
Plant Health Improvement
Self-watering improves plant health. It gives plants a steady water supply. This stops overwatering and underwatering problems. Plants get the right amount of moisture all the time. Roots grow stronger and plants become more resistant to stress. This leads to better growth and more vibrant leaves.

Credit: www.youtube.com
Frequently Asked Questions
How To Make An Automatic Waterer For Plants?
Create an automatic waterer by inverting a water-filled bottle with a small hole in the cap. Insert a Q-tip into the soil to control drip rate. Alternatively, use a cotton rope from a water reservoir to the soil for self-wicking irrigation.
Both methods provide slow, consistent watering.
How Can I Automatically Water My Plants While On Vacation?
Use a DIY drip system by inverting a water-filled bottle with a small hole in the cap. Insert the bottle’s tip into the soil to release water slowly. Alternatively, use a wicking system with a cotton rope connecting a water reservoir to the soil, drawing water as needed.
How Do You Make Homemade Self Watering Hacks?
Make a self-watering hack by inverting a water-filled bottle with a small hole in the cap. Insert a Q-tip or stick through the hole into the soil to drip water slowly. Alternatively, use a wet cotton rope from a water reservoir into the soil to wick moisture continuously.
How To Water Outdoor Plants While Away For 2 Weeks?
Use a self-watering drip system with an inverted water bottle or a wicking rope from a water reservoir to soil. Adjust drip speed to avoid overwatering. These DIY methods keep outdoor plants hydrated for two weeks without daily care.
Conclusion
Making a self-watering system helps your plants stay healthy and hydrated. It saves time and reduces the risk of overwatering. Both drip and wicking methods are simple and cost-effective. Use materials you already have at home to create your system.
Try these easy steps and enjoy watering your plants less often. Your plants will thank you with greener leaves and stronger growth. Give it a try today and watch your garden thrive.