How to Make Self Watering for Plants: Easy DIY Guide
Are you tired of constantly remembering to water your plants, only to find them thirsty when you forget? What if you could set up a simple system that waters your plants for you, even when you’re busy or away?
Making a self-watering setup for your plants is easier than you think—and it can save you time, stress, and help your plants thrive. You’ll discover straightforward DIY methods using everyday items like plastic bottles and cotton strings to keep your plants perfectly hydrated.
Ready to give your plants the care they deserve with less effort? Let’s dive in and make watering worry-free!
Materials Needed
Gathering the right materials is the first step to create a self-watering system for your plants. These materials are easy to find and affordable. Using simple items helps keep the project quick and manageable.
Choose materials that match the type of self-watering system you want to build. The two common types are drip systems and wick systems. Each requires a few specific items.
Plastic Bottle For Drip System
A clean plastic bottle works great as a water container. It holds water and slowly releases it into the soil. Choose a bottle size that fits your plant pot. A small or medium bottle usually works best.
Tools To Make Holes
You need a sharp object to poke holes in the bottle. A skewer, nail, or small screwdriver can make precise holes. These holes control the water flow and keep it steady.
Cotton String Or Shoelace For Wick System
A cotton string or old shoelace can transfer water from the reservoir to the soil. The string should be thick enough to hold moisture but thin enough to fit in the soil. Natural fibers work best for wicking water.
Water Reservoir Container
Use a container to hold water for the wick system. It can be a jar, cup, or small bucket. Ensure it fits near the plant so the string can stay submerged in water.
Tape And Scissors
Tape helps secure the bottle or string in place. Scissors cut the string or trim the bottle if needed. These tools help keep your self-watering system stable and neat.
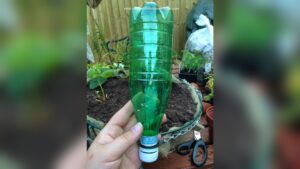
Bottle Drip System
The Bottle Drip System is a simple and effective way to water plants automatically. It uses a plastic bottle to deliver water slowly to the soil. This method helps keep plants hydrated without daily watering. It is perfect for small gardens or indoor plants. The drip system controls water release and prevents overwatering.
Preparing The Bottle
Choose a clean plastic bottle, 500ml or larger. Remove the label to avoid mold. Poke one small hole in the bottle cap using a nail or skewer. The hole size controls how fast water drips out. Fill the bottle with water. Screw the cap back tightly to avoid leaks.
Setting Up The Drip
Turn the bottle upside down. Insert the bottle neck into the soil near the plant’s roots. Push it gently so it stays stable. Make sure the hole in the cap is facing down. The water will drip slowly into the soil. This keeps roots moist without flooding.
Adjusting The Water Flow
If water drips too fast, use tape to cover part of the hole. For slower drip, insert a cotton swab or small stick into the hole. This limits water flow and prevents waste. Check the drip rate daily. Adjust as needed to keep soil slightly damp but not soggy.
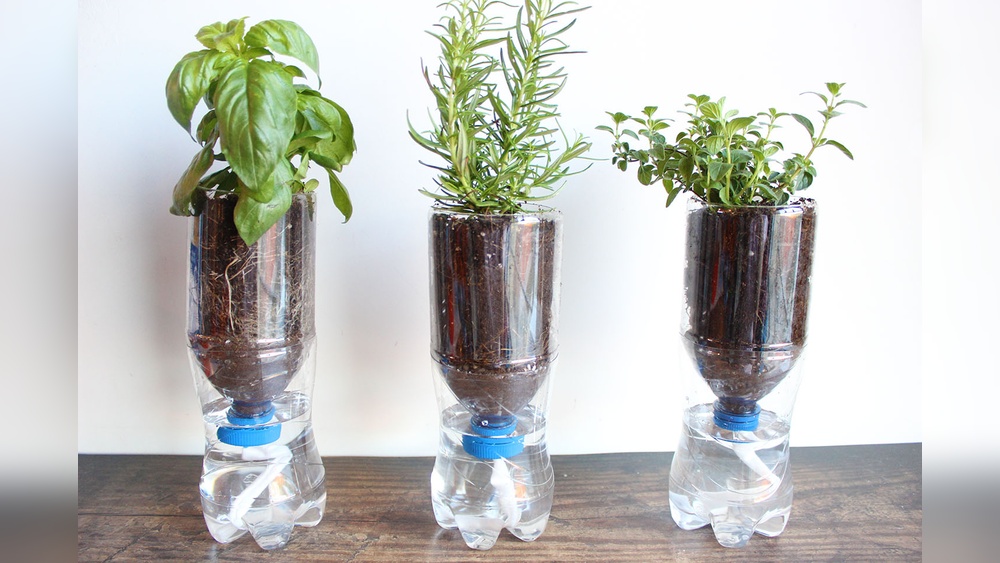
String Wicking System
The String Wicking System offers a simple way to keep plants hydrated. It works by drawing water from a reservoir into the soil. This system uses a string that moves water through capillary action.
This method is ideal for small pots and indoor plants. It helps maintain consistent soil moisture without daily watering. Setting up the system requires choosing the right string, arranging the reservoir, and positioning the string in the soil.
Choosing The Right String
Pick a string made from natural fibers like cotton or wool. These materials absorb and transfer water well. Avoid synthetic strings, as they repel water and reduce effectiveness. The string should be thick enough to hold moisture but thin enough to fit in the soil. A shoelace or cotton twine works perfectly for most plants.
Arranging The Water Reservoir
Select a container to hold the water near your plant. It can be a jar, bottle, or bowl. Fill it with clean water and place it at the same level as the plant pot. Ensure the reservoir is stable and won’t tip over. The string’s end will sit in this water to soak up moisture continuously.
Positioning The String In Soil
Insert one end of the string deep into the plant’s soil, near the roots. This helps deliver water directly where the plant needs it most. The other end should hang in the water reservoir. Make sure the string stays moist by checking the water level regularly. Adjust the depth and position to improve water flow if needed.
Tips For Best Results
Creating a self-watering system for your plants saves time and keeps them healthy. To get the best results, focus on how water moves and the plant’s needs. Small changes can make a big difference in watering success.
Controlling Water Release
Adjust the size of the hole in the bottle cap to control water flow. A smaller hole slows the drip, preventing overwatering. Use a cotton swab or stick inside the hole to fine-tune the rate. Check the drip speed daily and adjust if water pools on the soil surface.
Monitoring Soil Moisture
Check the soil moisture regularly using your finger or a moisture meter. The soil should feel damp but not soggy. If the soil stays wet for too long, reduce the water flow. Dry soil means increase the flow or refill the water reservoir more often. This helps keep plants comfortable and avoids root rot.
Maintaining The System
Clean the bottle and drip holes every week to prevent clogging. Remove algae or dirt that blocks water flow. Replace cotton wicks or strings if they become moldy or worn out. Inspect the system for leaks or damage to keep it working well. Proper care extends the life of your self-watering setup.
Troubleshooting Common Issues
Setting up a self-watering system for your plants can save time and keep them healthy. Yet, problems can arise that stop water from reaching the roots properly. Troubleshooting common issues helps maintain your system’s efficiency and prevents plant stress. Below are simple fixes for frequent problems in DIY self-watering setups.
Slow Or No Water Flow
Check if the bottle cap hole is clogged. Dirt or debris often blocks water flow. Clean the hole with a pin or needle to reopen it. If using a cotton string, make sure it is moist and not dry or broken. Ensure the water level is high enough to feed the system. Low water levels can stop the flow.
Overwatering Problems
Overwatering causes root rot and weak plants. Adjust the hole size in the bottle cap to reduce water release. Using a smaller hole slows the drip rate. For string systems, use a thinner or less absorbent string. Also, monitor soil moisture regularly. Stop watering if the soil stays too wet.
String Or Bottle Placement
Position the bottle or string correctly for best results. The bottle should be firmly placed upside down in the soil. Avoid touching the plant roots directly with the bottle. For strings, insert one end deep into the soil near the roots. Place the other end fully inside the water reservoir. Proper placement ensures steady water delivery.
Credit: easyplant.com
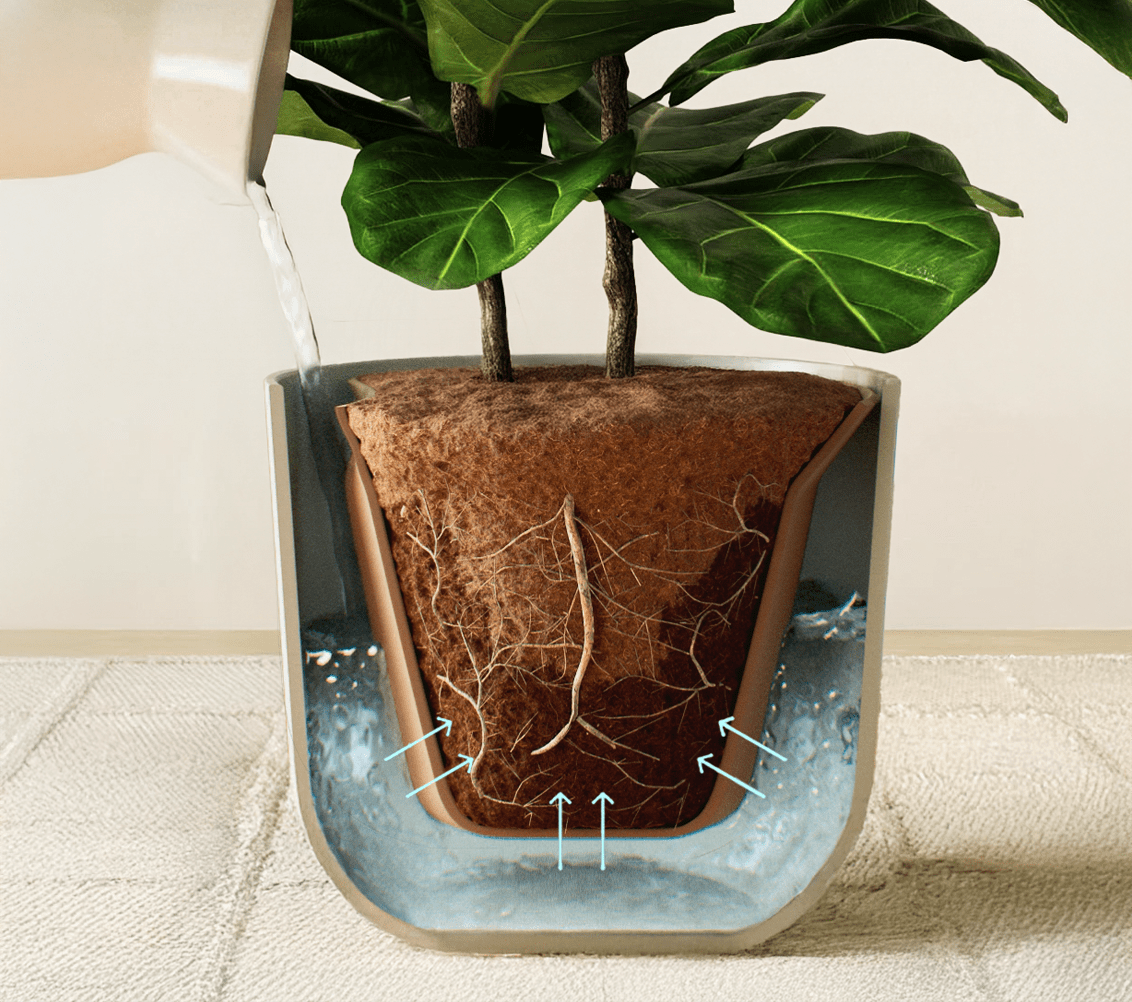
Benefits Of Self-watering
Self-watering systems offer many benefits for plant care. They keep plants hydrated without daily attention. This helps busy people maintain healthy plants easily.
These systems save water by delivering just the right amount. Plants get steady moisture, which promotes strong root growth. Self-watering also reduces the risk of overwatering and underwatering.
Consistent Moisture Supply
Self-watering provides a steady flow of water to plants. This prevents dry soil and water stress. Plants grow better with constant moisture levels.
Time-saving And Convenient
These systems reduce the need for frequent watering. They are ideal for people with busy schedules. Plants stay hydrated even during short trips or vacations.
Water Efficiency
Self-watering uses water more efficiently. It delivers water directly to the roots. Less water is lost through evaporation or runoff.
Healthier Plants
Consistent watering helps plants develop strong roots. It reduces disease caused by irregular watering. Plants look greener and grow faster.
Easy To Set Up
Making a self-watering system is simple and affordable. Many materials can be reused, like plastic bottles. This makes it a sustainable choice for gardeners.
Creative Variations
Creative variations in self-watering systems bring fun and function together. They let you tailor watering methods to your plants’ needs and style. Experimenting with different ideas can save water and time. It also keeps your plants healthy and happy.
Using Different Containers
Self-watering systems do not need special pots. You can use jars, plastic bottles, or even old cups. Each container offers unique ways to water plants slowly. A wide jar can hold more water for bigger plants. Small bottles work well for succulents or herbs.
Try cutting a bottle in half and using the top as a funnel. Fill the bottom with water and place the funnel upside down inside it. This design lets water drip gently into the soil. It is simple and perfect for indoor plants.
Automating With Timers
Timers add precision and ease to self-watering setups. They control when and how long water flows to your plants. Connect a timer to a small pump or drip system. Set it to water your plants at regular intervals.
This method works well for busy gardeners or frequent travelers. It reduces the risk of overwatering or underwatering. Timers also help maintain consistent moisture levels in the soil. This keeps plants growing strong without daily attention.
Combining Methods
Mixing different self-watering techniques can improve results. For example, use a wick system with a drip bottle for steady moisture. The wick draws water slowly, while the drip provides extra hydration when needed.
Combine containers of different sizes for plants with different water needs. Smaller pots get quick drips; larger pots have steady wicks. This custom approach matches watering to each plant’s habits.
Blending methods creates a balanced system. It saves water and prevents root rot. Plus, it adapts easily to your home or garden environment.

Credit: www.youtube.com
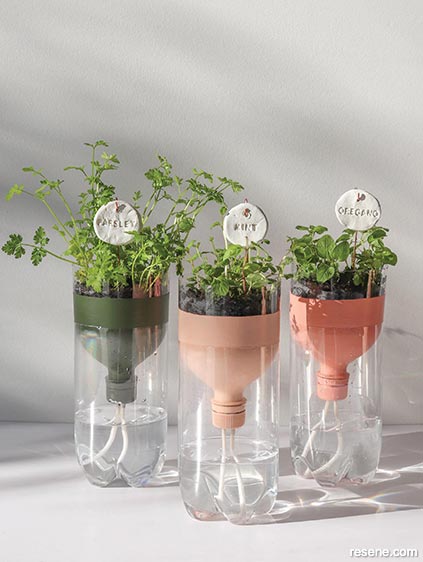
Credit: www.resene.co.nz
Frequently Asked Questions
How Do You Make Homemade Self Watering System?
Create a self-watering system by poking a hole in a plastic bottle cap, filling it with water, and placing it upside down in soil. Alternatively, use a cotton string from a water reservoir to the plant’s roots, allowing water to wick slowly and keep soil moist.
How To Water Plants While Away For 2 Weeks?
Use a DIY self-watering system with a plastic bottle drip or cotton string wick. Fill water, place bottle upside down or string from soil to reservoir. This ensures steady watering for two weeks while you’re away. Secure setup to prevent spills and check plant sunlight beforehand.
How Do You Make Auto Watering For Indoor Plants?
Create an auto watering system by inverting a water-filled bottle with a small hole in the cap into the soil. Alternatively, use a cotton string to wick water from a reservoir to the plant roots, ensuring consistent moisture through capillary action.
Is There A Way To Automatically Water Plants?
Yes, you can automatically water plants using DIY systems like plastic bottle drip or cotton string wicking. These use slow water release to keep soil moist consistently.
Conclusion
Creating a self-watering system helps keep plants healthy with less effort. You only need simple materials like bottles or cotton strings. These easy methods save water and prevent overwatering. Plants get steady moisture without daily care. Try building one today to enjoy thriving plants.
Small steps can make a big difference in plant care. Self-watering systems work well for busy gardeners or beginners. Your plants will thank you with greener leaves and stronger roots.