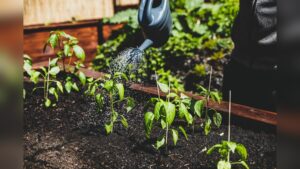
How to Make Automatic Plant Watering System: Easy DIY Guide

Are you tired of rushing home to water your plants or worrying about them drying out when you’re away? Imagine a simple solution that takes the guesswork out of plant care and keeps your greenery healthy all the time—without you lifting a finger every day.
Building your own automatic plant watering system is easier than you think. With just a few common materials and a little know-how, you can create a smart setup that waters your plants exactly when they need it. In this guide, you’ll discover easy, step-by-step methods like the drip bottle technique and wicking system that save you time and stress.
Ready to make your plants thrive effortlessly? Let’s dive in!

Credit: www.instructables.com
Materials Needed
Gathering the right materials is the first step to build an automatic plant watering system. The materials should be easy to find and affordable. Each component plays a key role in making the system work smoothly.
Below is a clear list of all the materials you need. These parts will help you create a reliable system that keeps your plants hydrated without much effort.
Microcontroller (arduino Or Esp8266)
The microcontroller acts as the brain of the system. It controls when and how much water is released. Arduino boards are popular and beginner-friendly choices. ESP8266 offers Wi-Fi connectivity for remote control.
Soil Moisture Sensor
This sensor measures the moisture level in the soil. It tells the microcontroller if the plant needs water. Choose a sensor that is accurate and easy to connect with your microcontroller.
Water Pump
The water pump moves water from the reservoir to the plant. Small submersible pumps work well for indoor plants. Make sure the pump’s power rating matches your power supply.
Water Reservoir
A container holds the water supply for your plants. It can be a plastic bottle, bucket, or tank. The reservoir size depends on how many plants you want to water automatically.
Tubing And Connectors
Tubing carries water from the pump to the plant pots. Use flexible plastic tubes that fit the pump outlet. Connectors help join tubes and keep the system leak-free.
Power Supply
The power supply provides electricity to the microcontroller and pump. A USB adapter or battery pack can work. Check the voltage and current requirements of your components before choosing.
Relay Module
A relay module allows the microcontroller to switch the pump on and off safely. It acts as a switch that handles high current. Use a relay suitable for your pump’s power needs.
Additional Tools
Some basic tools help in assembling the system. These include a soldering iron, wire cutters, jumper wires, and a breadboard. Having these tools makes wiring and testing easier.
Credit: www.youtube.com
Bottle Drip Method
The Bottle Drip Method is a simple way to water plants automatically. This method uses a plastic bottle to slowly release water into the soil. It helps keep plants hydrated without daily watering. The system works by letting water drip from the bottle at a controlled pace.
Preparing The Bottle
Choose a clean plastic bottle, usually 1 to 2 liters. Remove the label for easy handling. Poke small holes in the bottle cap using a pin or needle. The holes control the water flow. Fill the bottle with clean water before sealing it with the cap.
Setting Up The Drip
Turn the bottle upside down carefully. Push the bottle neck into the soil near the plant roots. Make sure the bottle stands steady and does not fall. The water will start dripping slowly into the soil. Position the bottle close enough to reach the roots.
Adjusting Water Flow
Check the drip rate after setting up the bottle. If water drips too fast, make the holes smaller or fewer. For slow dripping, slightly enlarge the holes. Water flow depends on hole size and bottle height. Adjust until the soil stays moist but not soaked.
Wicking System
The wicking system is a simple and effective way to water plants automatically. It uses a rope or cord to draw water from a reservoir to the soil. The water moves through the rope by capillary action. This system keeps the soil moist without overwatering.
Setting up a wicking system requires choosing the right materials and arranging them properly. Each step affects how well the water reaches the plants. Follow these guidelines to build a reliable automatic plant watering system.
Choosing The Right Rope
Pick a rope made of natural fibers like cotton or jute. These materials absorb and hold water well. Avoid synthetic ropes as they do not wick water effectively. The rope should be thick enough to carry enough water but thin enough to fit in the soil.
Arranging The Water Reservoir
Use a container like a bucket or bottle to hold the water. Place it higher than the plant pots to allow gravity to help the water flow. Keep the reservoir covered to prevent dust and insects. Refill the reservoir regularly to keep the plants hydrated.
Positioning The Rope In Soil
Insert one end of the rope into the water reservoir. Place the other end deep in the plant’s soil near the roots. Ensure the rope stays in contact with moist soil for better water transfer. Bury the rope enough to prevent it from drying out quickly.
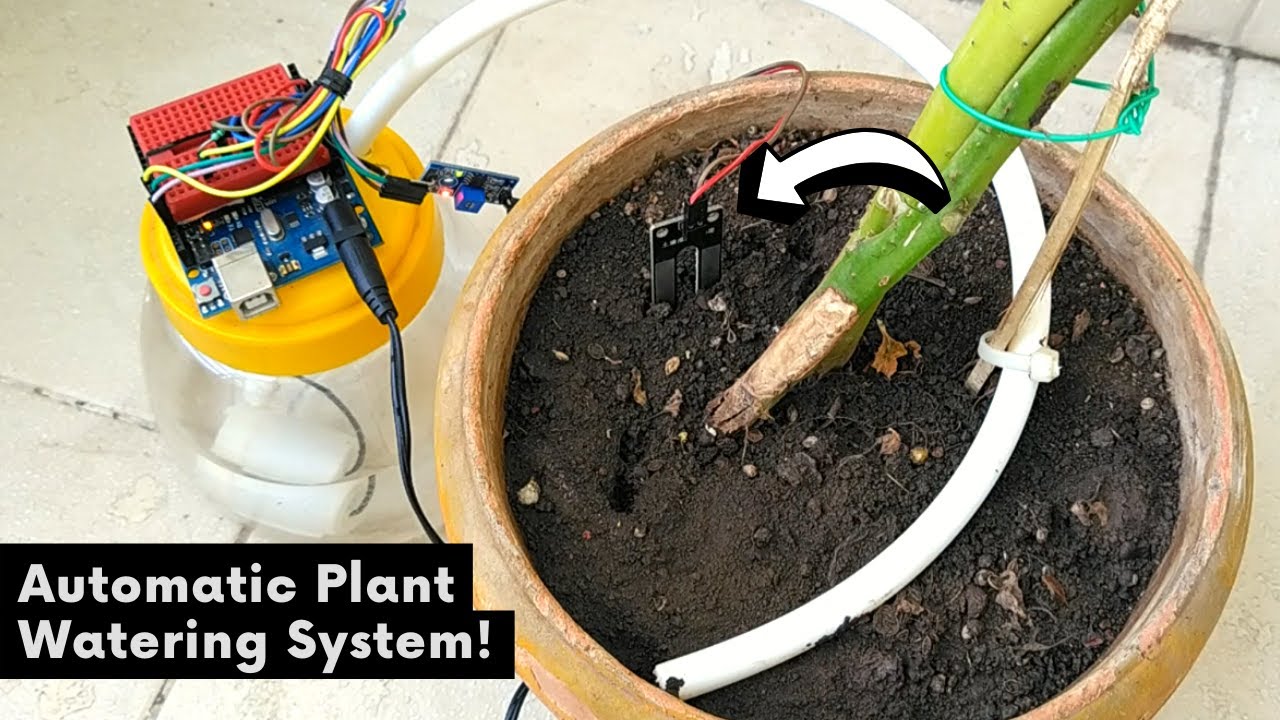
Using Arduino For Automation
Using Arduino for automation makes building an automatic plant watering system simple and affordable. Arduino is a small microcontroller that controls devices based on your instructions. It can read sensor data and activate pumps or valves to water plants. This technology helps maintain consistent watering without needing your constant attention.
Arduino allows customization of watering schedules and adapts to your plant’s needs. It can monitor soil moisture and water only when necessary. This saves water and promotes healthy plant growth. Creating such a system requires some basic components, wiring, and coding knowledge.
Essential Components
Start with an Arduino board like the Arduino Uno. You need a soil moisture sensor to detect water levels in the soil. A water pump or solenoid valve controls water flow to the plants. Use a relay module to connect the pump safely to the Arduino. A power supply is required for the pump and Arduino. Tubing and containers help deliver water from the reservoir to the plants.
Wiring And Coding Basics
Connect the soil moisture sensor to the Arduino’s analog input pins. Attach the relay module to digital output pins to control the pump. Make sure the pump’s power source matches its requirements. Write a simple code to read sensor data and switch the pump on or off. Use Arduino IDE software to upload the code to your board. Test the connections carefully to avoid short circuits.
Scheduling Watering Times
Use Arduino’s built-in timers or add a real-time clock module for accurate scheduling. Program specific times to check soil moisture and water plants. Set delays between watering to prevent overwatering. Adjust watering frequency based on plant type or weather conditions. This automation keeps plants healthy even if you forget to water them. Scheduling also helps conserve water by avoiding unnecessary watering.
Tips For Effective Watering
Effective watering is key to keeping plants healthy and thriving. An automatic plant watering system helps, but you must optimize its setup. Small changes make big differences in watering results. Focus on smart placement, accurate moisture tracking, and tailoring water needs for each plant.
Placement Of Water Source
Position the water source close to plant roots. Roots absorb water best near the base of plants. Avoid placing water sources where runoff occurs. Keep the water container higher than the plants. This helps water flow naturally through tubes or drip lines. Proper placement ensures efficient water delivery without waste.
Monitoring Soil Moisture
Check soil moisture regularly to avoid overwatering or drought stress. Use moisture sensors for precise readings. Sensors trigger watering only when soil is dry. Manual checks work too by feeling soil with fingers. Wet soil means hold off watering. Dry soil signals it is time to water. Monitoring prevents root rot and promotes healthy growth.
Adapting To Plant Types
Different plants need different amounts of water. Succulents require less water than leafy vegetables. Adjust watering schedules for each plant type. Group plants with similar needs together. This avoids underwatering or overwatering. Customize the watering duration and frequency. Tailoring water supply keeps plants happy and reduces water waste.
Troubleshooting Common Issues
Setting up an automatic plant watering system is a smart step for plant care. Still, small problems can occur. These issues may affect how well your plants get water. Troubleshooting helps find and fix these problems fast. This keeps your plants healthy and your system working well. Below are common issues and easy fixes to keep your watering system in top shape.
Fixing Drip Rate Problems
Drip rate issues cause too much or too little water. Check the drip emitters first. They may be set too high or too low. Adjust the flow by turning the emitter valve. Sometimes, pressure from the water source is uneven. Use a pressure regulator to keep it steady. Test the drip rate on each plant pot. Make small changes and watch the results. Consistent drips help plants get just the right water.
Preventing Clogs
Clogs block water and stop the system from working well. Dirt and debris often cause these clogs. Use a filter at the water source to catch dirt. Clean the filter regularly to keep water flowing. Flush the tubing with clean water every few weeks. Remove and clean drip emitters if they clog often. Keeping parts clean prevents blockages and ensures steady watering.
Maintaining The System
Regular maintenance keeps your system running smoothly. Check for leaks in tubes and connections. Replace damaged parts quickly to avoid water waste. Test the timer and sensors to ensure proper watering times. Clean all components to stop buildup and rust. Winterize your system if you live in cold areas. Good care helps the system last longer and keeps plants happy.
Advanced System Enhancements
Enhancing your automatic plant watering system improves its performance and convenience. Advanced features help tailor watering to your plants’ exact needs. These upgrades reduce water waste and keep plants healthier. Explore ways to add sensors, enable remote monitoring, and boost energy efficiency.
Integrating Sensors
Sensors detect soil moisture levels accurately. They tell the system when plants need water. This prevents overwatering and underwatering. Use moisture sensors that connect to your controller. Some systems include light and temperature sensors too. These help adjust watering based on weather and sunlight. Sensor data guides the watering schedule smartly.
Remote Monitoring Options
Remote monitoring lets you check your plants from anywhere. Use Wi-Fi or Bluetooth to link the system to your phone. Receive real-time updates on soil moisture and water levels. Some setups send alerts if plants need attention. Control watering times remotely for flexibility. This feature is handy during travel or busy days.
Energy-efficient Solutions
Energy-saving components reduce power use in your watering system. Solar panels can power pumps and sensors outdoors. Use low-voltage pumps for less electricity. Set timers to water only during cooler parts of the day. Efficient systems lower energy bills and help the environment. Small changes make your garden greener and smarter.

Credit: projecthub.arduino.cc
Frequently Asked Questions
How To Make An Automatic Watering System For Plants At Home?
Create an automatic watering system by placing an inverted plastic bottle with holes in soil. Use cotton rope from a water reservoir to soil for a wicking effect. Both methods release water slowly, keeping plants hydrated without daily watering.
How Can I Automatically Water My Plants While On Vacation?
Use a plastic bottle with holes inverted into the soil for slow watering. Alternatively, use a cotton rope wick from a water reservoir to the plant. Both methods provide steady moisture while you are away.
Can I Make My Own Self-watering Planter?
Yes, you can make a self-watering planter using simple materials like plastic bottles and cotton rope. Use the bottle drip or wicking method to provide plants with a steady water supply automatically. This DIY approach saves time and keeps your plants healthy.
How Do You Make Homemade Self Watering Hacks?
Make a self-watering hack by inverting a water-filled bottle with holes in the cap into the soil. Use a cotton rope from a water reservoir to the plant soil to wick water slowly. Both methods release water gradually, keeping plants hydrated effortlessly.
Conclusion
Building an automatic plant watering system saves time and effort. It keeps your plants healthy and hydrated every day. Simple materials like bottles, tubes, or cotton ropes work well. You can customize the system to fit your plant’s needs. This project helps you care for plants even when busy or away.
Start small and improve your system as you learn. Enjoy greener plants with less worry and stress. Try making your own system today and see the difference.