How Do You Make a Self Watering Bottle for Plants: Easy DIY Guide

Do you ever worry about your plants drying out when you’re busy or away? Keeping your green friends healthy doesn’t have to be a constant hassle.
Imagine a simple, clever way to water your plants automatically, using something as common as a plastic bottle. In this guide, you’ll learn exactly how to make a self-watering bottle for your plants that slowly releases water when they need it most.
It’s easy, affordable, and perfect for anyone who wants happy, thriving plants without daily watering. Ready to take the stress out of plant care? Let’s dive in and get your plants the water they deserve—effortlessly!

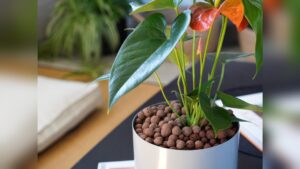
Credit: londontolandgirl.com
Materials Needed
To create a self-watering bottle for your plants, gathering the right materials is essential. These items must be easy to find and simple to use. This section covers the basic supplies needed to start your project. Keep the list short and practical for better results.
Choosing The Right Bottle
Select a plastic bottle that fits your plant’s size. A 1-liter bottle works well for small to medium plants. Clear bottles help you see the water level easily. Avoid bottles with labels or rough surfaces. These can block water flow or cause leaks. Make sure the bottle has a screw-on cap for easy modification.
Additional Supplies
You will need a sharp knife or scissors to make holes in the bottle. Cotton or nylon string acts as a wick to draw water to the soil. Water is, of course, the main ingredient. A small nail or pin helps create tiny holes for water release. Optionally, use tape to secure the wick or fix any leaks. All these supplies keep the self-watering system working smoothly.

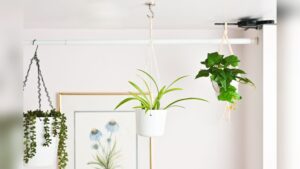
Credit: spicymoustache.com
Preparing The Bottle
Preparing the bottle is the first step to create a self-watering system for your plants. This step ensures the bottle is clean and ready to deliver water slowly to the soil. Taking time to prepare the bottle correctly helps your plants get consistent moisture without overwatering.
Cleaning The Bottle
Start by rinsing the bottle with warm water. Remove any labels and glue residue completely. Use mild soap and a bottle brush to scrub the inside. Rinse thoroughly to remove all soap. A clean bottle prevents mold and bacteria growth inside the watering system.
Making Drainage Holes
Use a sharp tool to make small holes in the bottle cap. These holes control water flow and prevent soil from getting too wet. Make two or three tiny holes for slow dripping. Test the water release before placing the bottle in the soil. Proper drainage holes keep your plant roots healthy and hydrated.
Creating The Watering Mechanism
Creating the watering mechanism is the key step in making a self-watering bottle for plants. This mechanism controls how water moves from the bottle to the soil. It ensures the plant gets water slowly and steadily. Two simple methods work well: the inverted bottle method and the wick system setup. Both are easy to make and effective for keeping soil moist.
Each method uses basic materials and natural principles. They help reduce watering frequency and prevent overwatering. Choose the method that suits your plant type and container size best.
Inverted Bottle Method
Start with a clean plastic bottle. Make small holes in the bottle cap or near the bottle’s neck. These holes allow water to drip out slowly. Fill the bottle with water and screw the cap back on tightly.
Turn the bottle upside down and push the neck into the soil near the plant’s roots. The water will slowly drip out as the soil dries. This method works well for larger pots and plants that need steady moisture.
Wick System Setup
Use a cotton string or strip of fabric as a wick. Place one end of the wick into a water container. Bury the other end into the soil of your plant pot. Position the water container higher than the plant to help water flow.
The wick draws water from the container into the soil by capillary action. This system works well for small pots and plants that need gentle, constant watering. It is simple and uses common household items.
Installing The Self-watering Bottle
Installing the self-watering bottle correctly is key for healthy plants. Proper placement and stability help the water reach roots effectively. Follow simple steps to set up your DIY watering system.
Positioning Near Plant Roots
Place the bottle close to the plant’s roots. The water should drip directly into the soil where roots absorb moisture. Avoid placing it too far or on top of the stem. Insert the bottle neck into the soil at a slight angle. This setup ensures steady water flow and prevents soil erosion.
Securing The Bottle
Keep the bottle stable to avoid tipping over. Use small sticks or stones around the base for support. Push the bottle firmly into the soil until it feels secure. Check the setup daily, especially on windy days. A stable bottle delivers water consistently and protects your plant’s growth.
Adjusting Water Flow
Adjusting the water flow in your self-watering bottle is key for healthy plants. Too much water can drown roots, while too little will dry them out. The goal is a steady, slow drip that matches your plant’s needs.
This section explains how to control the drip rate and test the system effectively. Small changes can make a big difference in plant care.
Controlling Drip Rate
Start by making small holes in the bottle cap or near the neck. Use a pin or needle to create these holes. Larger holes let water flow faster, smaller holes slow it down.
You can also wrap a piece of cloth or cotton around the bottle neck. This helps regulate water flow by absorbing and releasing water slowly.
Adjust the number and size of holes until water drips at a slow, steady pace. Keep the bottle upside down and insert it into the soil near the plant roots.
Testing The System
After adjusting the drip rate, watch the plant for 24 hours. Check if the soil stays moist but not soaked. If water pools on the surface, reduce the drip rate.
Observe the bottle daily to ensure it empties slowly. Refill it as needed to keep the flow consistent.
Make small adjustments based on the plant type and weather conditions. This ensures the plant receives the right amount of water every day.

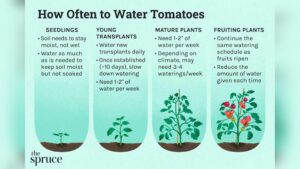
Credit: www.truevalue.com
Tips For Effective Use
Using a self watering bottle for plants can save time and keep your plants healthy. Some simple tips will help you get the best results. Proper use ensures plants get the right amount of water. This prevents overwatering or drying out. Follow these easy steps to improve your plant care routine.
Plant Placement
Place your plant in a spot with good light but not direct sun. Direct sunlight can heat the water bottle and harm roots. Keep the bottle close to the plant’s base. This ensures water reaches the roots directly. Avoid placing plants where wind can dry the soil quickly.
Grouping Plants For Humidity
Group plants together to increase humidity around them. Plants release moisture through their leaves, raising humidity. This helps plants that like moist air. Use the self watering bottles with grouped plants for steady water supply. Keep groups away from heaters or air conditioners that dry air fast.
Alternatives To Diy Bottles
Using a DIY self-watering bottle works well for many plants. Still, some gardeners prefer ready-made or alternative solutions. These options offer convenience and often better control over water delivery. They suit different plant types and care routines.
Explore some popular alternatives that help keep your plants hydrated without daily watering.
Self-watering Planters
Self-watering planters come with built-in water reservoirs. They release water slowly to the soil as needed. These planters reduce the risk of overwatering or underwatering. They are ideal for busy people or beginners. Plus, they come in various sizes and designs to fit your space.
Watering Globes
Watering globes are glass or plastic bulbs filled with water. Inserted into the soil, they release water gradually. This method works well for small to medium plants. It keeps soil moist longer than surface watering. Watering globes are simple to use and refill. They also add a decorative touch to your plants.
Automated Drip Systems
Automated drip systems deliver water directly to plant roots at set times. They use timers and tubing to control flow rates. This system is perfect for larger gardens or multiple plants. It saves time and ensures consistent watering. Installation requires some setup but pays off in convenience and plant health.
Troubleshooting Common Issues
Troubles with self watering bottles are common but easy to fix. Knowing how to spot and solve these problems keeps plants healthy. This section covers key issues and simple solutions for smooth watering.
Preventing Overwatering
Overwatering can drown roots and harm plants. Use a bottle with small holes to control water flow. Check soil moisture often to avoid excess water. Adjust the bottle’s hole size for slower dripping if needed. Avoid placing the bottle too deep in the soil. Keep the water level low inside the bottle to reduce risk. Proper placement and hole size help prevent water buildup.
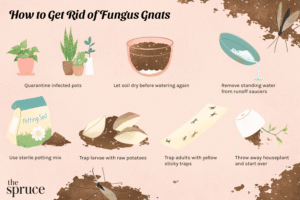
Dealing With Clogs
Clogs block water flow and stop plants from getting moisture. Dirt and debris often cause clogs in the bottle’s opening. Clean the bottle and holes regularly to keep water flowing. Use a thin wire or pin to clear blocked holes. Filter water before filling the bottle to reduce particles. If clogs persist, try using a different bottle or cap with larger holes. Regular care ensures steady watering without interruptions.
Frequently Asked Questions
How Do You Make Homemade Self Watering Bottles For Plants?
Make holes in a plastic bottle, fill it with water, and insert it upside down into the soil near the plant. Water seeps out slowly, keeping soil moist.
How Can I Keep My Plants Watered While I’m Away?
Use self-watering systems like plastic bottle drip or wick setups. Place plants on a water-soaked towel for humidity. For longer trips, use timed sprinklers or ask a neighbor to water. Self-watering planters and watering globes also help maintain moisture automatically.
How Do You Make Homemade Self Watering Hacks?
Make a self-watering hack by poking holes in a water-filled plastic bottle. Insert it upside down into soil near roots. Water slowly seeps out, keeping soil moist. Alternatively, use a cotton wick from a water container to the soil for continuous watering.
Can I Use A Wine Bottle To Self Water Plants?
Yes, you can use a wine bottle to self-water plants by making small holes and inserting it upside down into the soil. It slowly releases water as the soil dries. This DIY method helps maintain consistent moisture for your plants.
Conclusion
Making a self-watering bottle for plants is simple and effective. This DIY method saves time and keeps plants healthy. Just a few steps create a steady water supply for roots. It works well for busy gardeners or when away. Use clean bottles and small holes for slow water release.
This easy system helps plants grow strong without daily watering. Give it a try and enjoy thriving, well-watered plants.